



From never-opened-a-terminal to running real work: install, setup, API keys, and a chapter for your job.
Last verified: 1 October 2026 · Written for designers, video editors, writers, business owners, media buyers and developers · No coding background needed
Who this guide is for
Six kinds of people. Find yourself, then follow the path.
| You are | What Claude Code does for you | Your chapter |
|---|---|---|
| 🎨 Graphic designer | Resizes, exports, renames, removes backgrounds, generates first-round concepts | Designers |
| 🎬 Video editor | Compresses, subtitles, cuts vertical versions, finds the best clips | Video editors |
| ✍️ Writer | Holds your voice, outlines, fact-checks, repurposes, keeps 14 chapters consistent | Writers |
| 💼 Business owner | Turns exports into reports, notes into SOPs, chores into one-word commands | Business owners |
| 📈 Media buyer | Reads the Meta and Google exports, mines search terms, writes copy to the character | Media buyers |
| 💻 Developer | Plans, edits, tests and ships across your codebase | Developers |
This guide replaces two earlier ones, Claude Code, 0 to Hero and The Claude Code Guide. We merged them, rewrote them for people who've never used a terminal, and re-checked every command, price and claim against the official sources on 1 October 2026. We use Claude Code at Massive Impact every day, and this guide was researched with it, which is exactly why it gets the strictest checking in our library.
How to use this guide
| Step | Part | Time |
|---|---|---|
| 1 | Part 1 · Never used a terminal? Start here | 10 min |
| 2 | Part 2 · Install Claude Code (the only manual install) | 10 min |
| 3 | Part 3 · Your first session | 20 min |
| 4 | Part 4 · One message sets up your whole computer | 15 min, mostly waiting |
| 5 | Part 5 · API keys and .env files | 15 min |
| 6 | Part 6 · Your role chapter | as long as you like |
| 7 | Parts 7 to 10 · Power-ups, usage limits, safety, troubleshooting | dip in when needed |
| 8 | The cheat sheet · every command and shortcut on one page | print it |
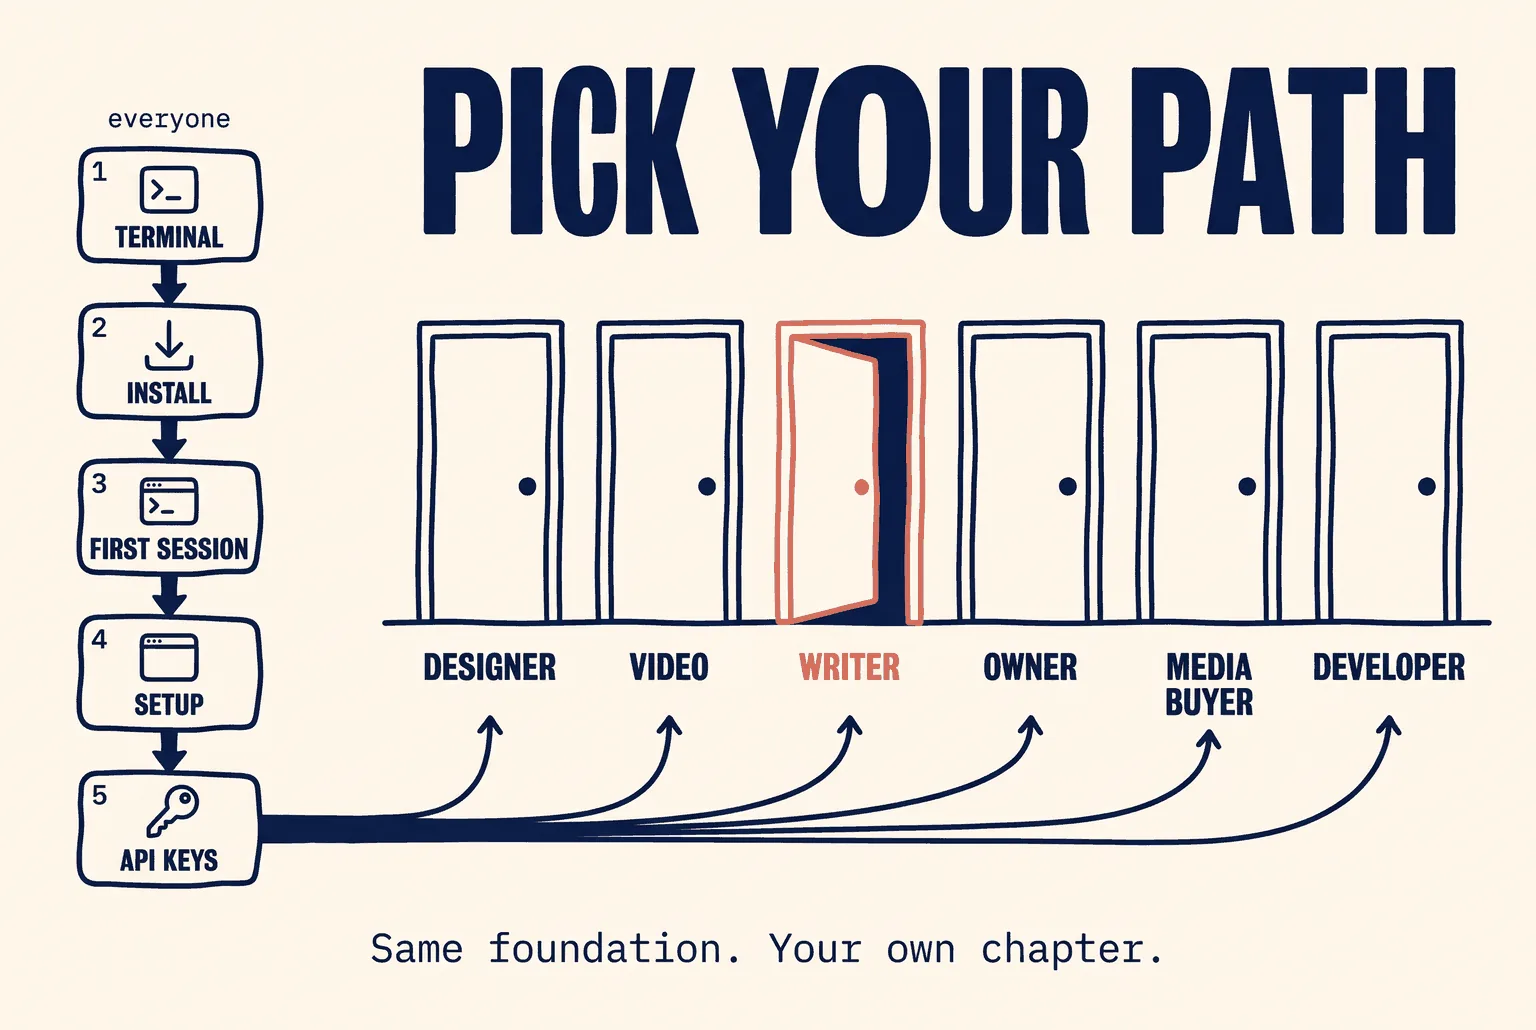
Do Parts 1 to 5 in order, once. After that, live in your own chapter.
In one sentence
Claude Code is an AI that works directly in a folder on your computer: it reads the files, makes new ones, runs programs, and checks its own work, while you watch and approve.
The analogy that makes it click
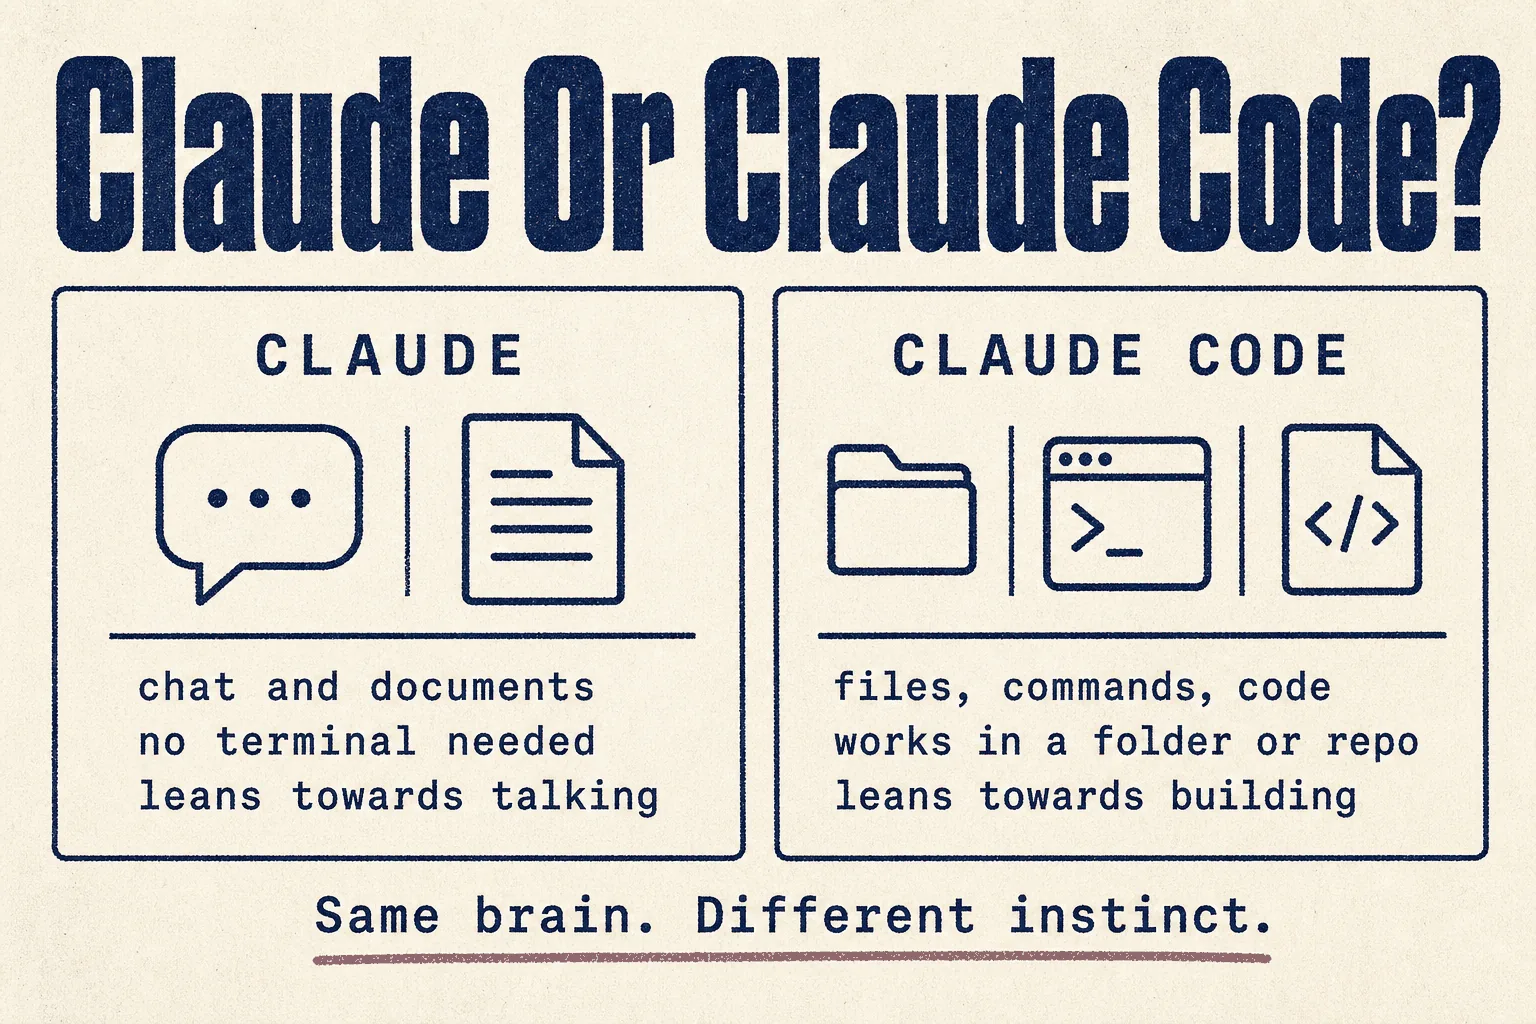
A normal AI chat is a consultant on the phone. You describe the problem, they tell you what to do, and you do it.
Claude Code is the same consultant sitting at your desk, using your keyboard. It opens the files itself, makes the change, runs it, sees what went wrong, fixes it, and shows you what it did. You stay in charge: it asks before anything that matters.
The folder is the key idea. Whatever lives in that folder (photos, videos, drafts, spreadsheets, a website, code), Claude Code can work on it directly.
At a glance
| What it is | An AI agent that works on files and runs programs in a folder |
| Made by | Anthropic |
| Cost | Pro plan, $20/month or above. Not on the free plan |
| Default model | Claude Opus 5.5 |
| Runs on | macOS 13+, Windows 10 (1809+) or 11, Ubuntu 20.04+, Debian 10+. 4 GB RAM minimum |
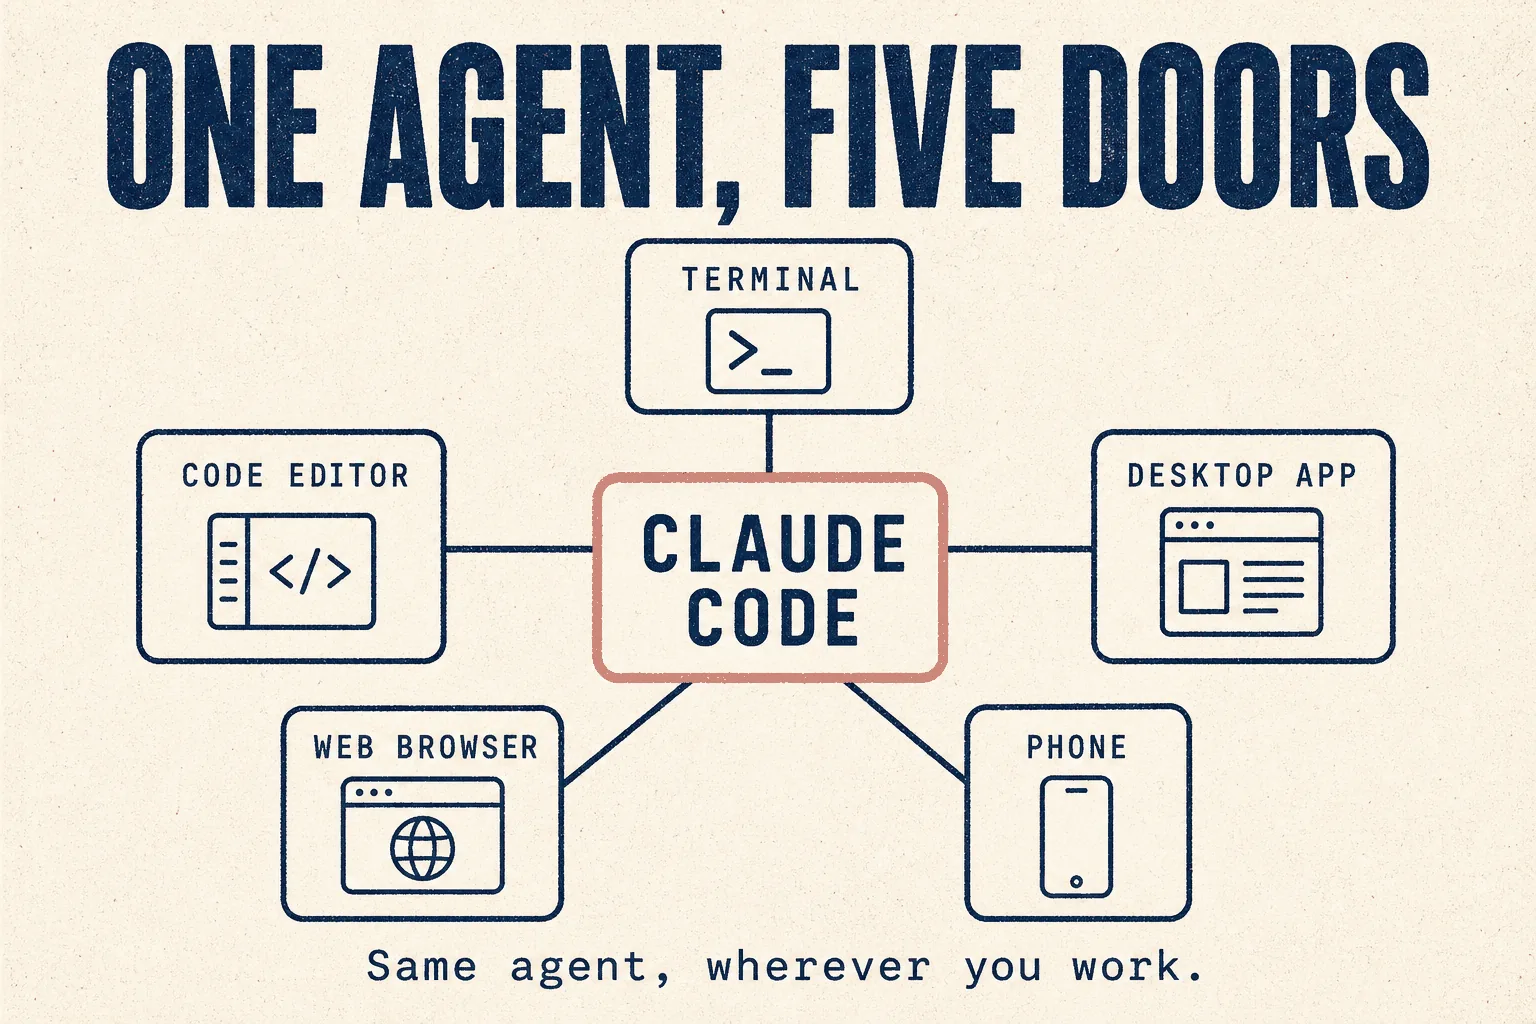
| Where you use it | Terminal, desktop app, web browser, VS Code, JetBrains, and your phone |
| Setup time | About an hour for everything in Parts 1 to 5 |
| Popularity | 148,751 GitHub stars on its public repository ✅ checked 1 Oct 2026 |
| Verdict | 🟢 Run it |
Part 1 · Never used a terminal? Start here
Skip this part if you already know what cd means. Everyone else, give it ten minutes.
It's the part that makes everything after it feel easy.
What the terminal is
The terminal is a window where you type instructions to your computer instead of clicking. That's all it is. It looks old-fashioned, and that's the point: it's simple. One line in, one answer out.
You'll type in it maybe five times in this whole guide. After that, you'll mostly be typing plain English to Claude, and Claude uses the terminal for you.
How to open it
| Mac | Windows | |
|---|---|---|
| Open it | Press Cmd + Space, type Terminal, press Enter |
Press the Windows key, type PowerShell, press Enter |
| What you'll see | a line ending in % or $ |
a line starting with PS C:\Users\...> |
| Paste into it | Cmd + V |
Ctrl + V, or right-click |
| Run what you typed | Enter | Enter |
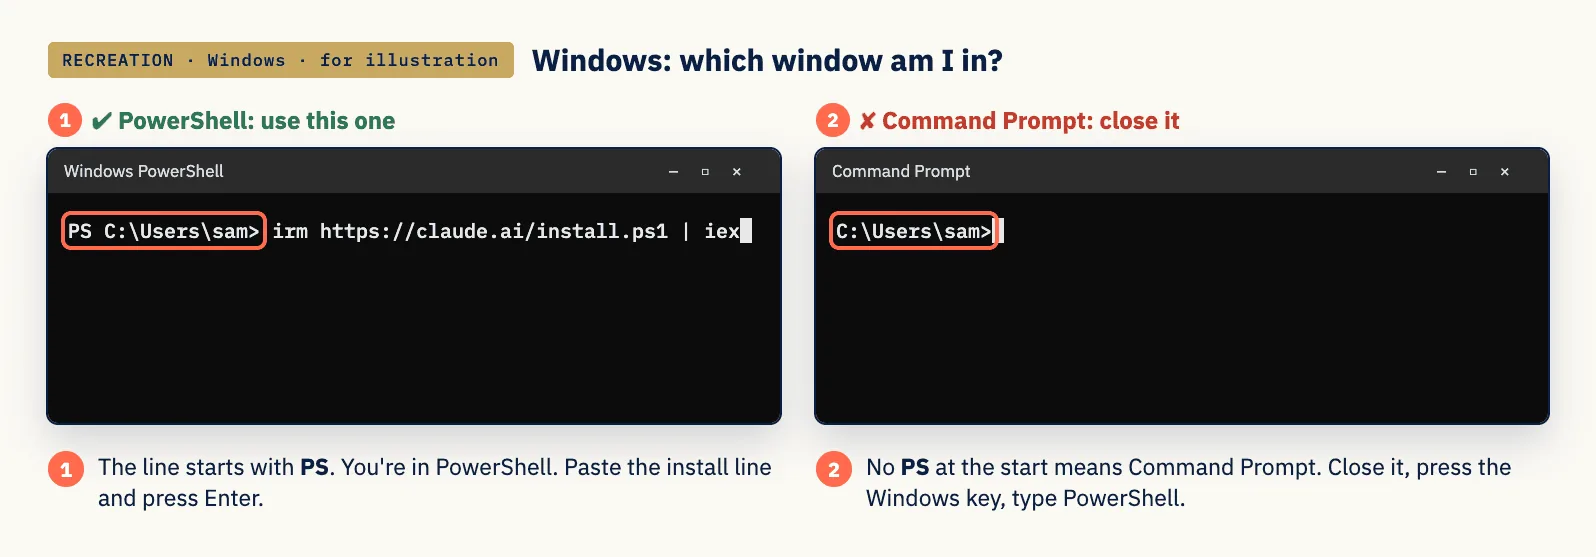
Windows users, one important habit. Use PowerShell, not the old "Command
Prompt". If your line starts with PS, you're in the right place. If it starts with
just C:\, close it and open PowerShell instead. Using the wrong one is the most
common first mistake.
The only eight things you need to know
| What you want | Mac | Windows (PowerShell) |
|---|---|---|
| Where am I? | pwd |
pwd |
| What's in this folder? | ls |
ls |
| Go into a folder | cd Documents |
cd Documents |
| Go back up one folder | cd .. |
cd .. |
| Make a new folder | mkdir my-project |
mkdir my-project |
| Open this folder in Finder / Explorer | open . |
explorer . |
| Stop whatever is running | Ctrl + C |
Ctrl + C |
| Repeat an earlier command | ↑ arrow key |
↑ arrow key |
The drag-and-drop trick: type cd (with a space after it), then drag any folder
from Finder or File Explorer into the terminal window. Its full address appears. Press
Enter and you're in it. No typing paths, ever.
Words you'll see in this guide
Read this table once. Come back to it whenever a word trips you up.
| Word | What it means in plain English |
|---|---|
| Folder / directory | The same thing. Programmers say directory. |
| Path | A folder's full address, like /Users/sam/Documents/project |
| Command | One instruction typed into the terminal |
| Install | Putting a program on your computer so you can use it |
| Package manager | An app store you use from the terminal (Homebrew on Mac, WinGet on Windows) |
| Library / package | A ready-made toolkit a script borrows, like a plug-in |
| Script | A small program, usually one file, that does one job |
| Python / Node.js | The two "engines" most scripts need to run. Covered in Part 4 |
| API | A way for one program to ask another program to do something |
| API key | A password that lets your scripts use a paid AI service. Covered in Part 5 |
.env file |
A small private file in your folder where API keys live |
| Model | The AI brain doing the work (Claude Opus, Claude Sonnet, GPT Image, and so on) |
| Prompt | What you type to the AI |
| Token | The unit AI usage is measured in, roughly three quarters of a word |
CLAUDE.md |
A text file of standing rules Claude reads every time it opens your folder |
| Skill | A saved workflow you can rerun with one command |
| MCP / connector | A plug that connects Claude to another app (Gmail, Figma, Google Ads) |
| Git | A free tool that saves a snapshot of your folder, so you can undo anything |
Part 2 · Install Claude Code
This is the only part you install by hand. After this, Claude Code installs everything else for you (Part 4).
Step 1 · Pick a plan
Claude Code is not on the free plan. You need one of these:
| Plan | Price (claude.com/pricing, checked 1 Oct 2026) | Good for |
|---|---|---|
| Pro | $20/month, or $17/month billed yearly | Trying it, light daily use. Start here. |
| Max 5x | $100/month | Daily heavy use |
| Max 20x | $200/month | All-day use, big projects |
| Team / Enterprise | per seat | Companies |
All plans share one usage allowance across Claude chat and Claude Code. It resets on a rolling five-hour window, with a weekly limit on top. Part 8 shows how to make it last.
Step 2 · Choose how you want to use it
| Option | What it is | Choose it if |
|---|---|---|
| A · Desktop app | The Claude app for Mac or Windows. Click the Code tab. Claude Code is built in | You never want to see a terminal |
| B · Terminal | Type claude in a terminal window |
You want the full power, and everything in this guide |
| C · Web | claude.ai/code in your browser, nothing installed | You want to try it in two minutes |
This guide uses Option B, because the automatic setup in Part 4 needs it. Everything you learn also works in the desktop app. You can use both.
Option A in one line: download from claude.com/download,
sign in, click Code. One difference: in the app you change modes with the menu
next to the send button, not with Shift + Tab.
Step 3 · Install it (Option B)
Open your terminal (Part 1), paste one line, press Enter.
On a Mac:
curl -fsSL https://claude.ai/install.sh | bash
On Windows (in PowerShell):
irm https://claude.ai/install.ps1 | iex
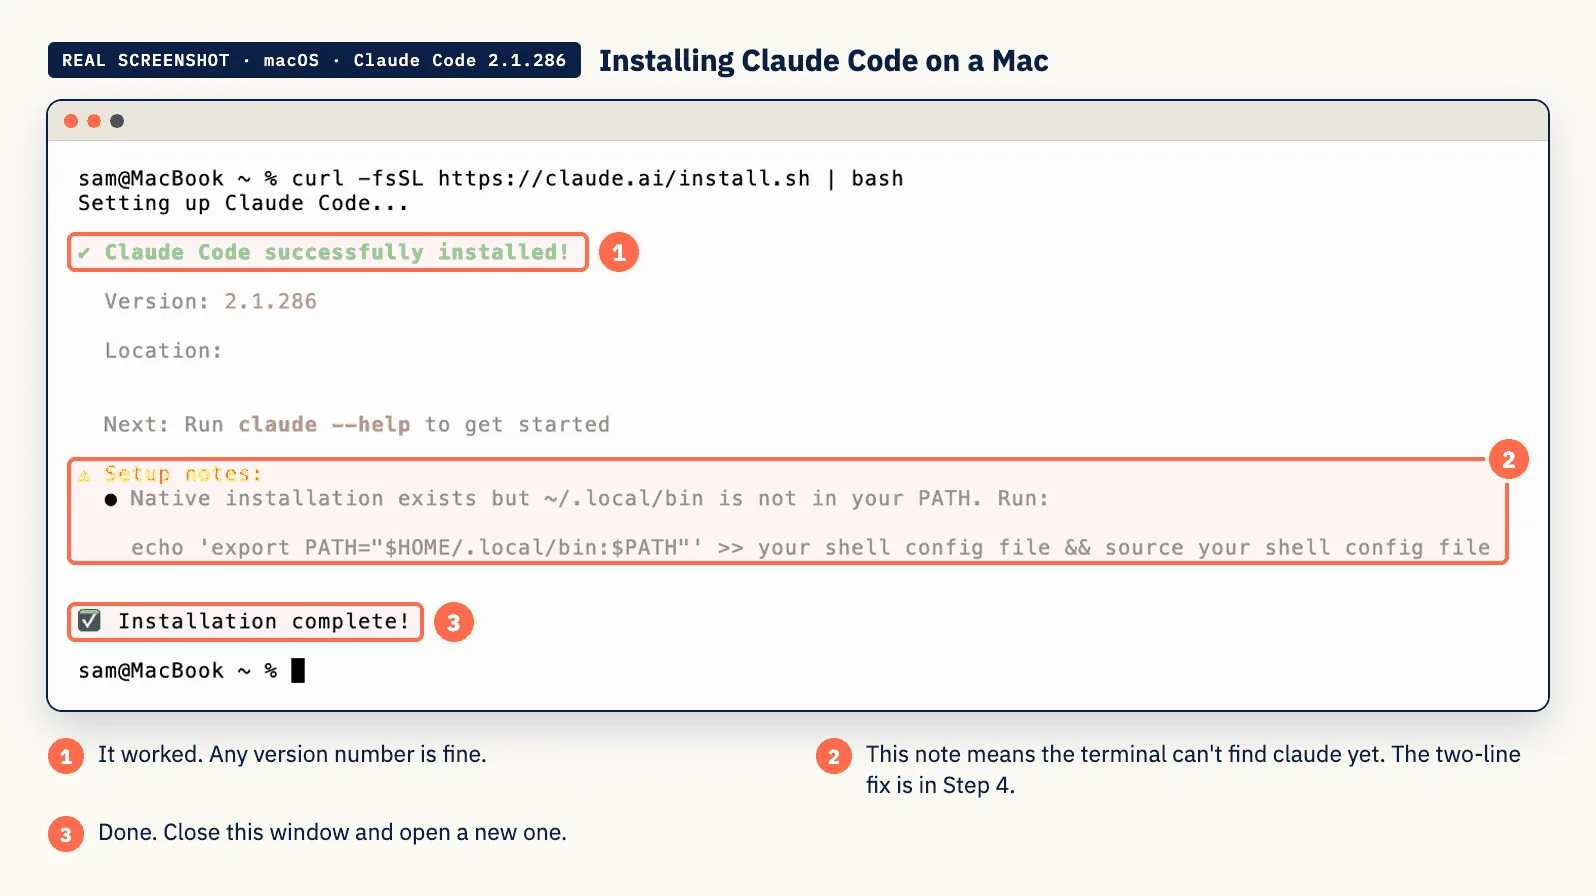
You don't need to be an administrator. It takes a minute or two. This standard install updates itself in the background, so you'll never have to reinstall.
Windows: two common errors, and what they mean (from Anthropic's setup page):
- "The token '&&' is not a valid statement separator": you're in PowerShell but pasted the Command Prompt version. Use the PowerShell line above.
- "'irm' is not recognized": you're in Command Prompt. Close it, open PowerShell.
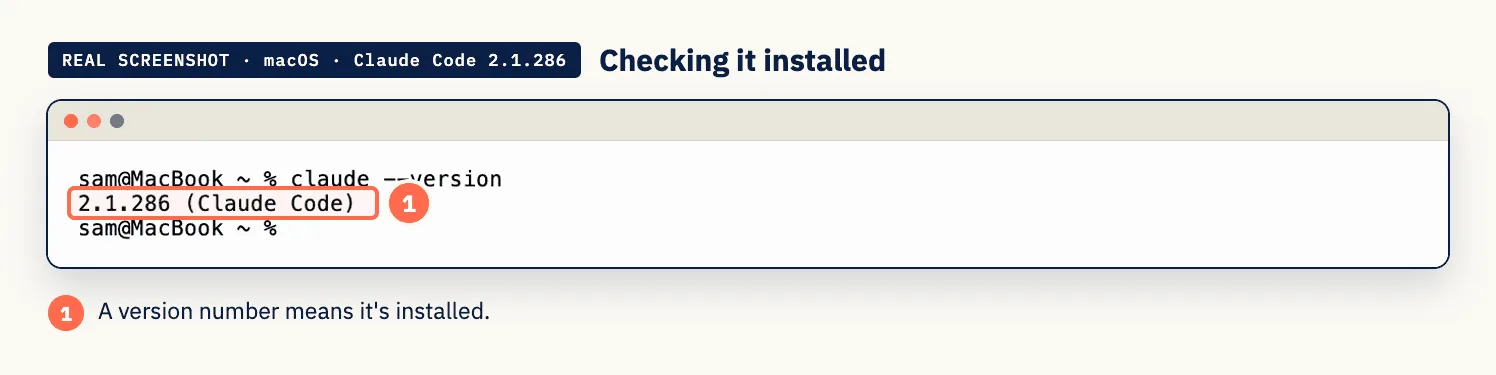
Step 4 · Check it worked
Close the terminal window and open a new one (new installs only show up in new windows). Then type:
claude --version
You should see a version number followed by (Claude Code). Any number is fine.
If it says "command not found"
This is the most common first problem, and it's easy to fix. Look at the screenshot from
Step 3 again: the installer finished, but printed "Setup notes" saying
~/.local/bin is not in your PATH. PATH is the list of folders your terminal
searches for programs. Claude Code was installed into a folder that isn't on the list yet.
Mac fix (from Anthropic's install troubleshooting page). Paste these two lines, one at a time:
echo 'export PATH="$HOME/.local/bin:$PATH"' >> ~/.zshrc
source ~/.zshrc
Then claude --version again.
Windows fix. Close PowerShell completely and open a new one first. Still not recognised? Start Claude Code by its full address, which always works:
& "$env:USERPROFILE\.local\bin\claude.exe"
Once it's running, ask it: "Add your install folder to my PATH permanently, so claude
works in every new PowerShell window."
Step 5 · First start and login
Type:
claude
The first time, it walks you through three quick screens.
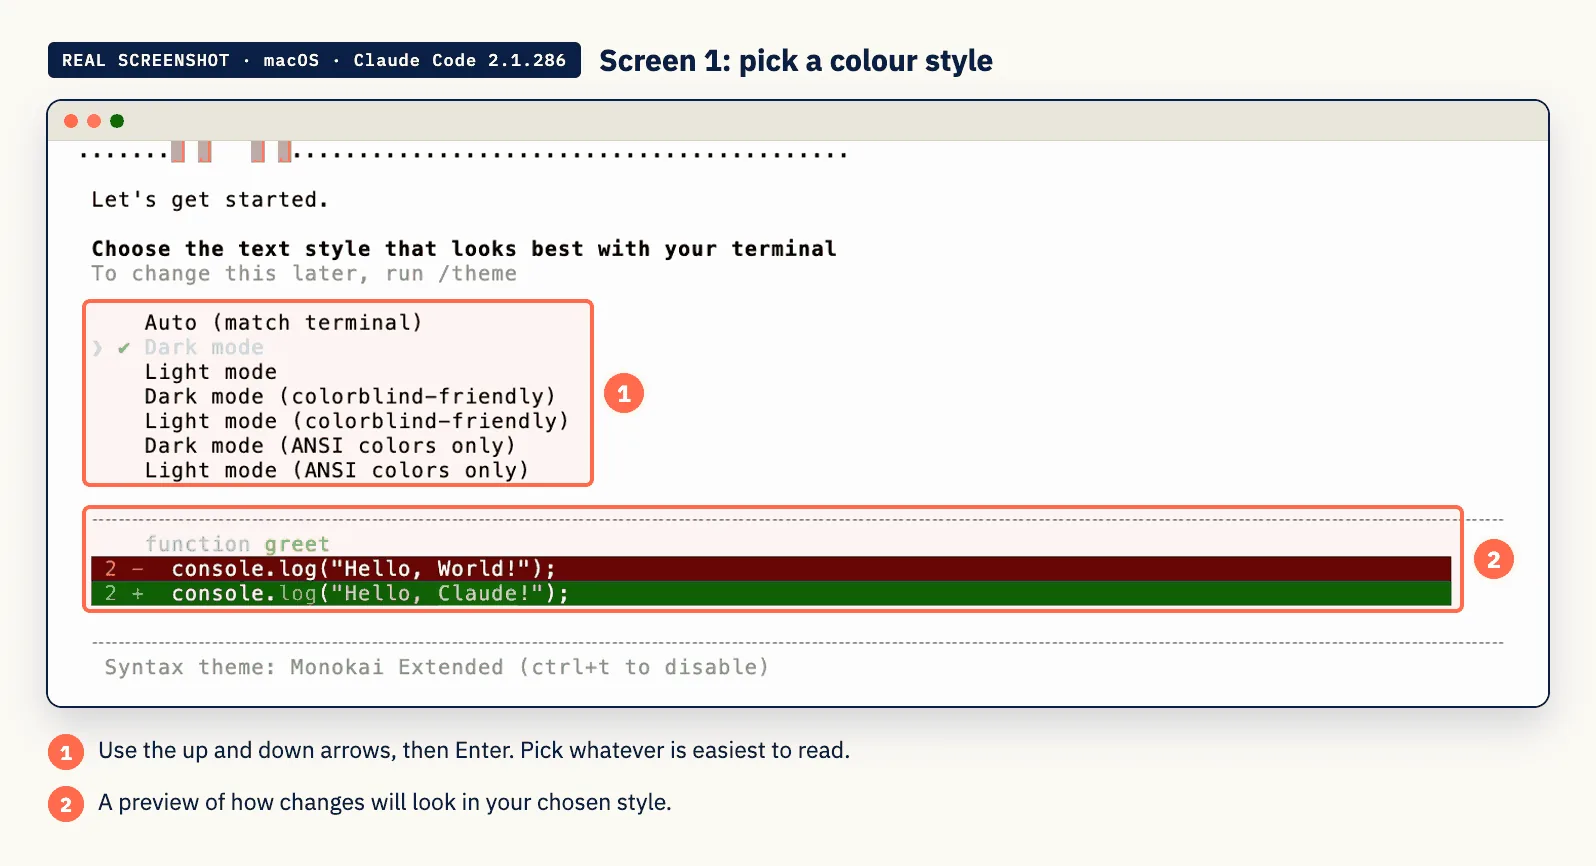
Screen 1: pick a colour style. Use the arrow keys, press Enter. Pick whichever is
easiest to read. You can change it later with /theme.
Screen 2: pick how to log in. Choose 1, Claude account with subscription. Your browser opens, you sign in, and you're done.
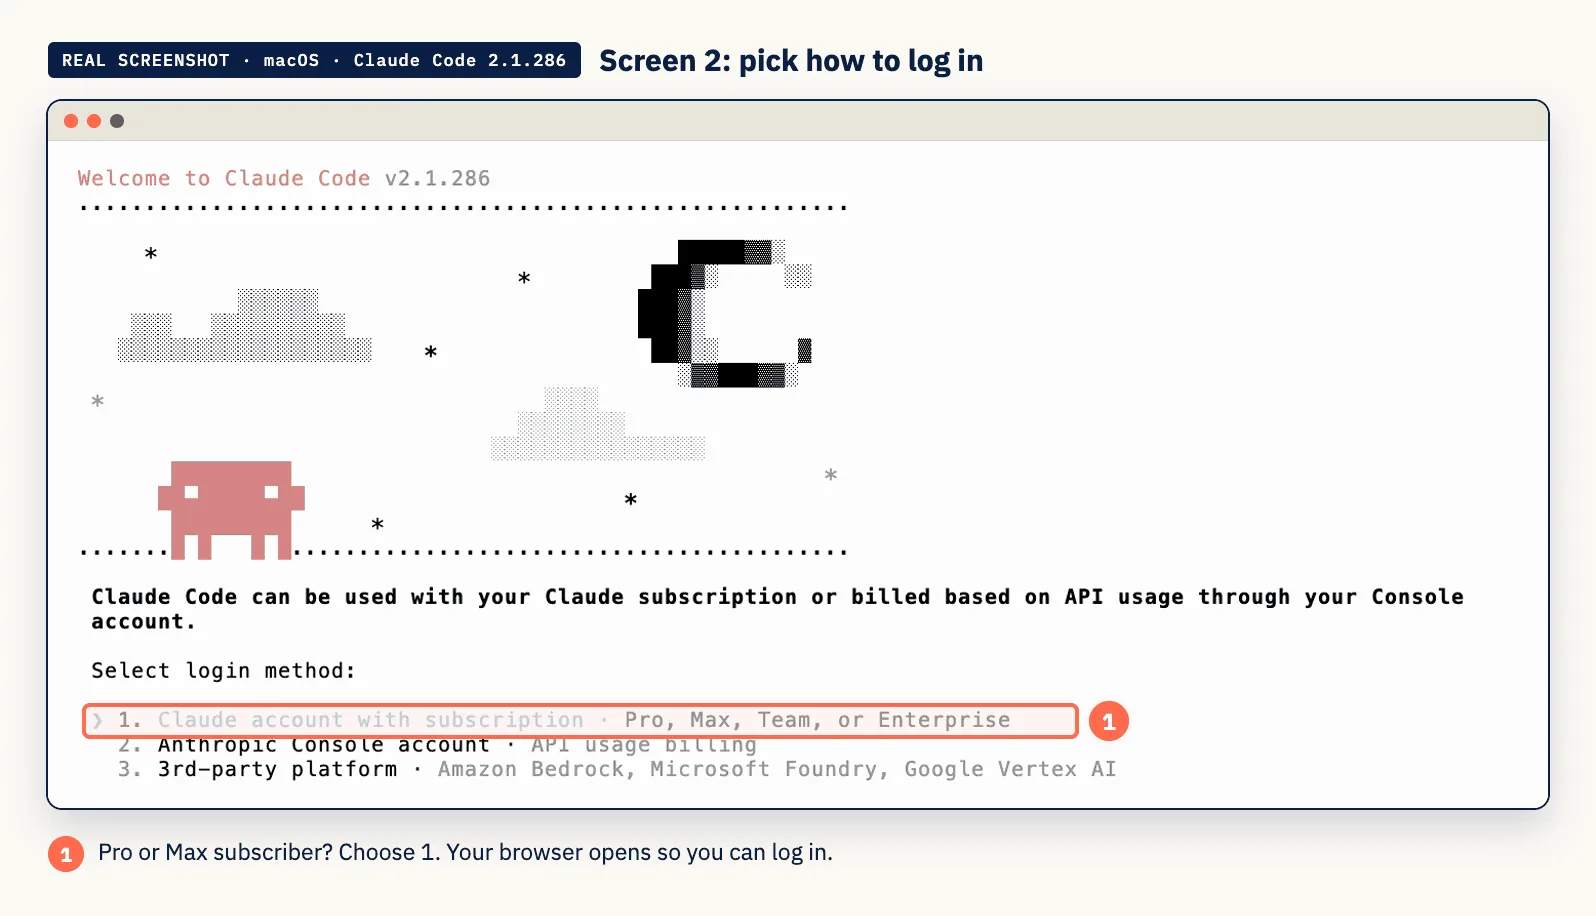
Don't choose option 2 unless someone has told you to. It bills by usage through a developer account, not your monthly plan.
Screen 3: trust this folder? Claude Code asks this every time you open a new folder. If it's your own folder, use the down arrow to pick Yes, I trust this folder and press Enter.
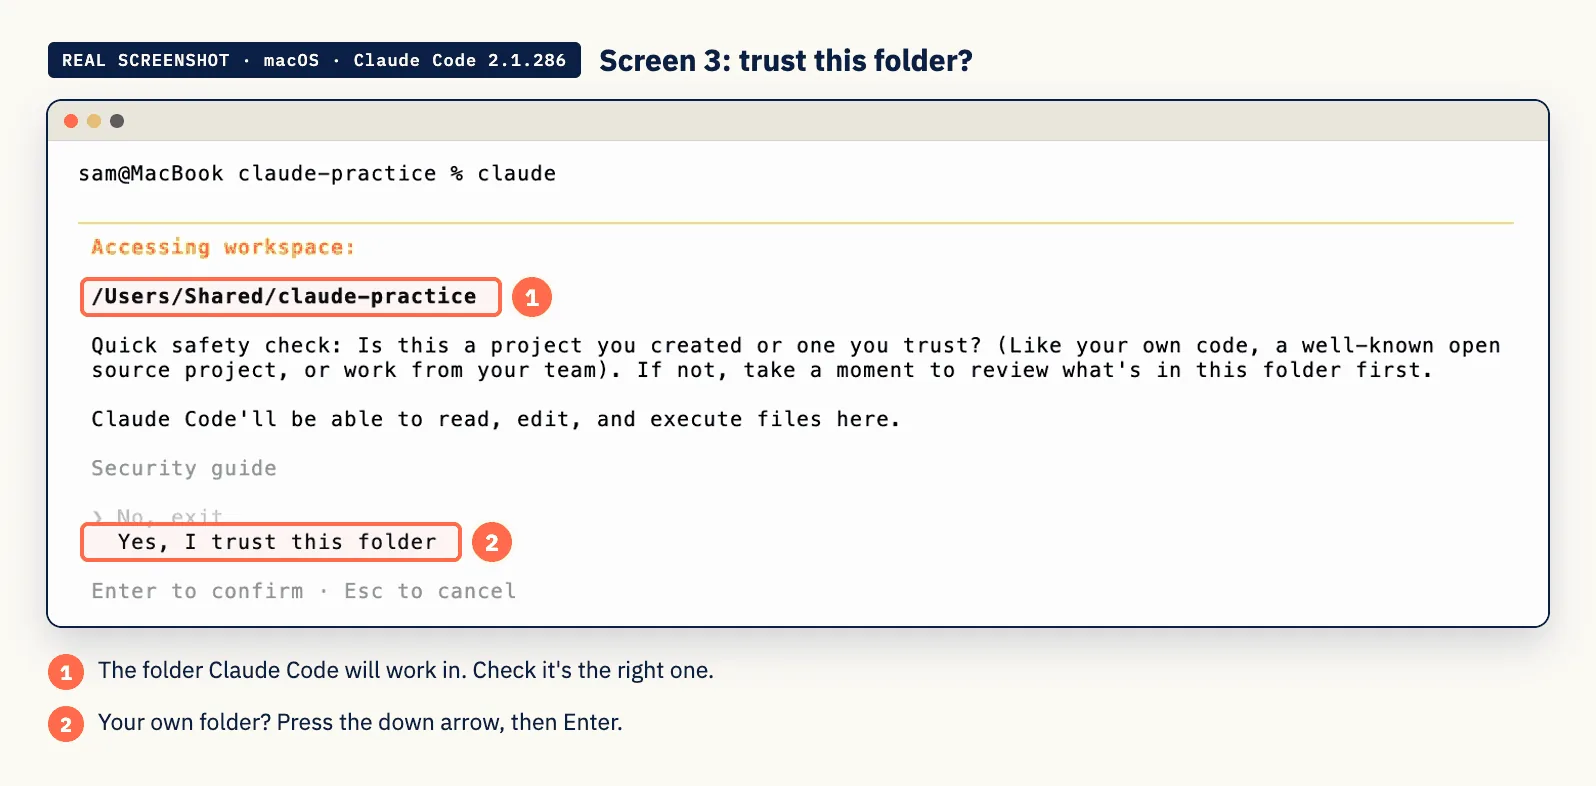
That's it. You're in. Part 3 shows you around.
Part 3 · Your first session
Make a practice folder
Never point Claude Code at your whole computer. Give it one folder to work in. Make a practice one now:
| Mac | Windows |
|---|---|
mkdir ~/claude-practice |
mkdir ~\claude-practice |
cd ~/claude-practice |
cd ~\claude-practice |
Drop a few real files in it: a spreadsheet export, some notes, a couple of images. Real files make a better first session than an empty folder.
Start Claude Code
From inside the folder, type:
claude
The first time, it asks you to log in through your browser and asks whether you trust this folder. Say yes, it's your folder.
You'll see the welcome screen: the version, the model it's using, your plan and your
folder. At the bottom is a line with a ❯ and a cursor. That's where you type, in
plain English.
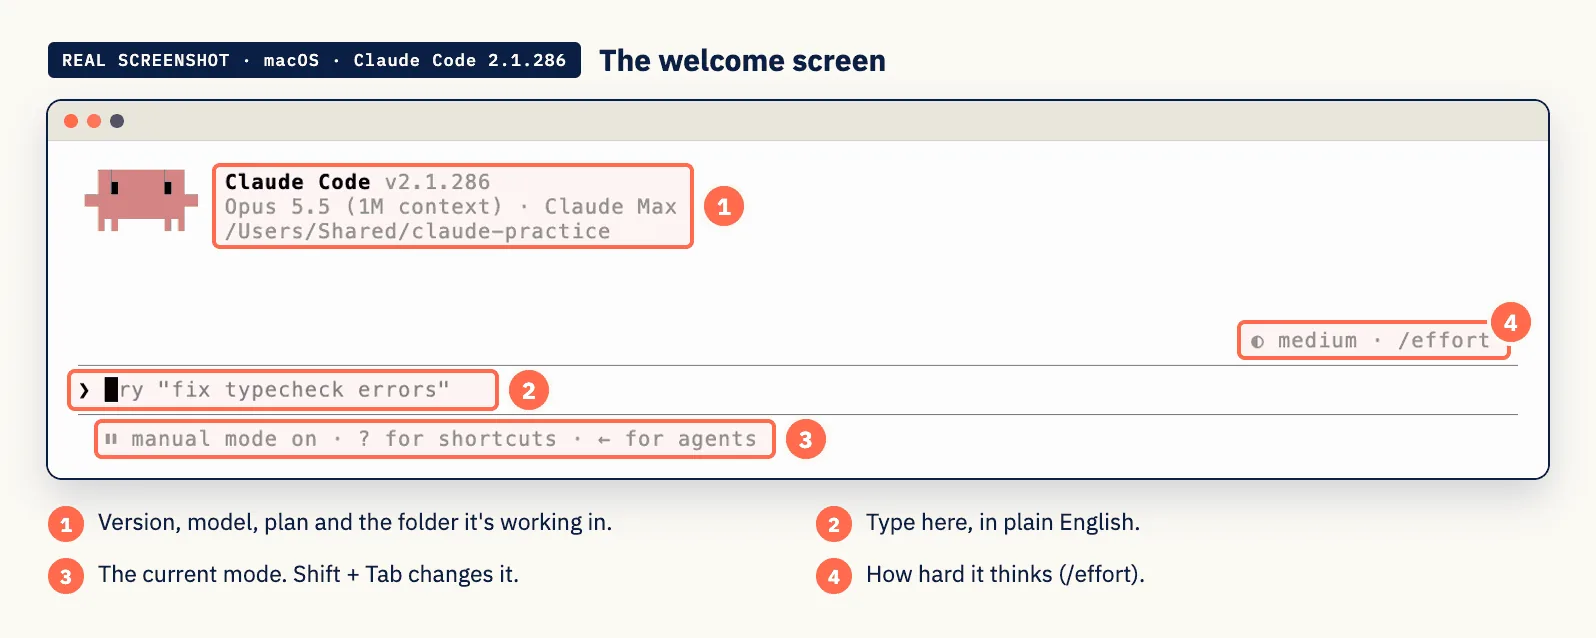
Try:
What's in this folder? Explain it to me like I'm new to all this.
Don't change anything.
The permission prompts (read this carefully)
Reading files and harmless checks (like asking which Python version you have) happen without asking. When Claude wants to change something, like create a file or run a command that alters your computer, it stops and asks. Two real screenshots:
When it wants to create or edit a file:
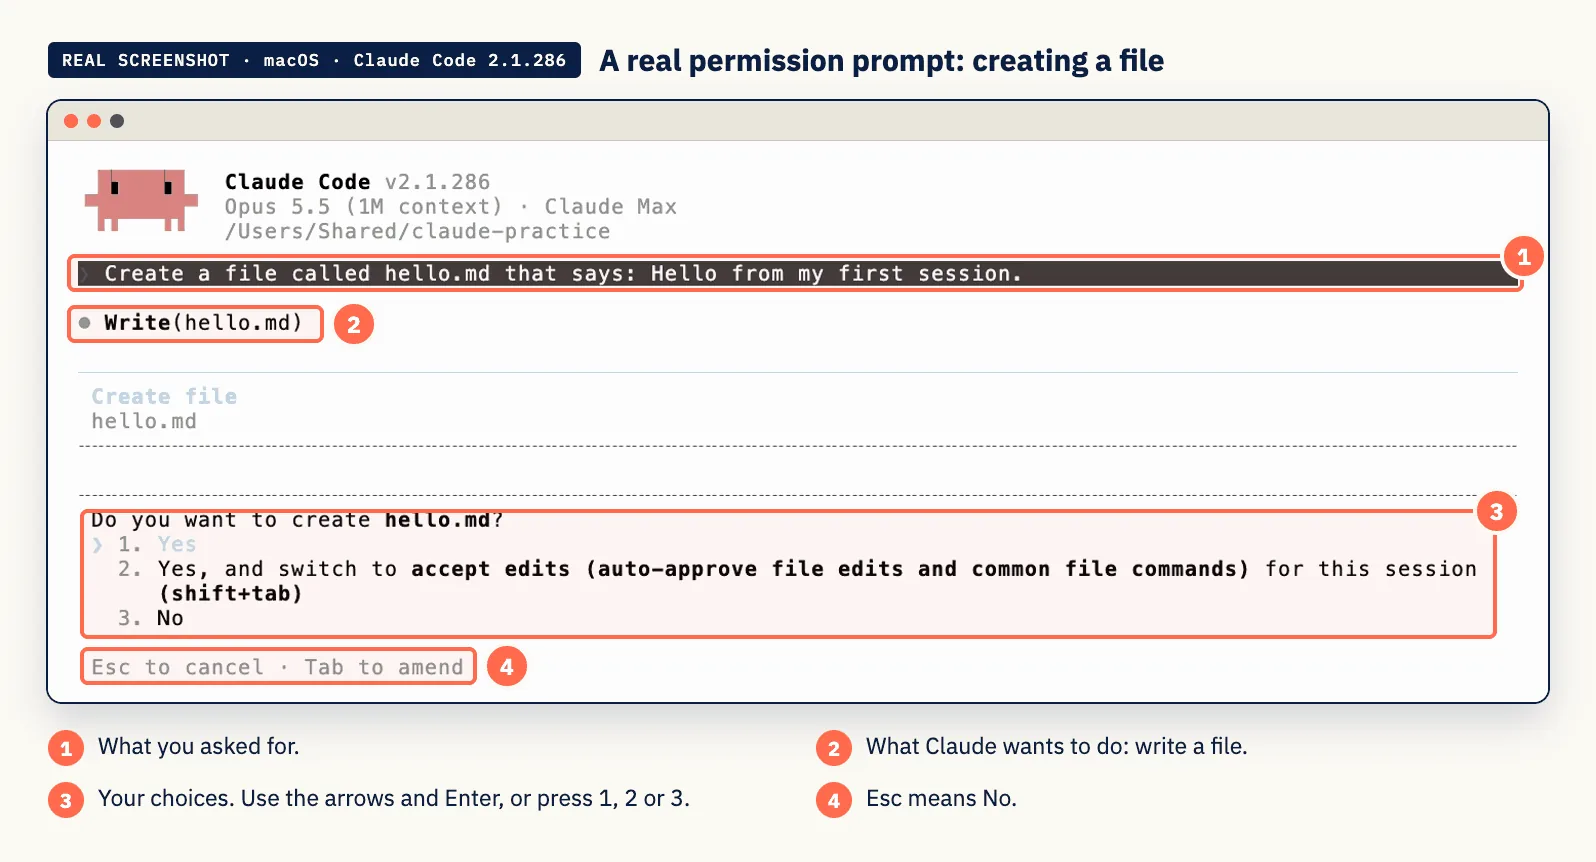
When it wants to run a command:
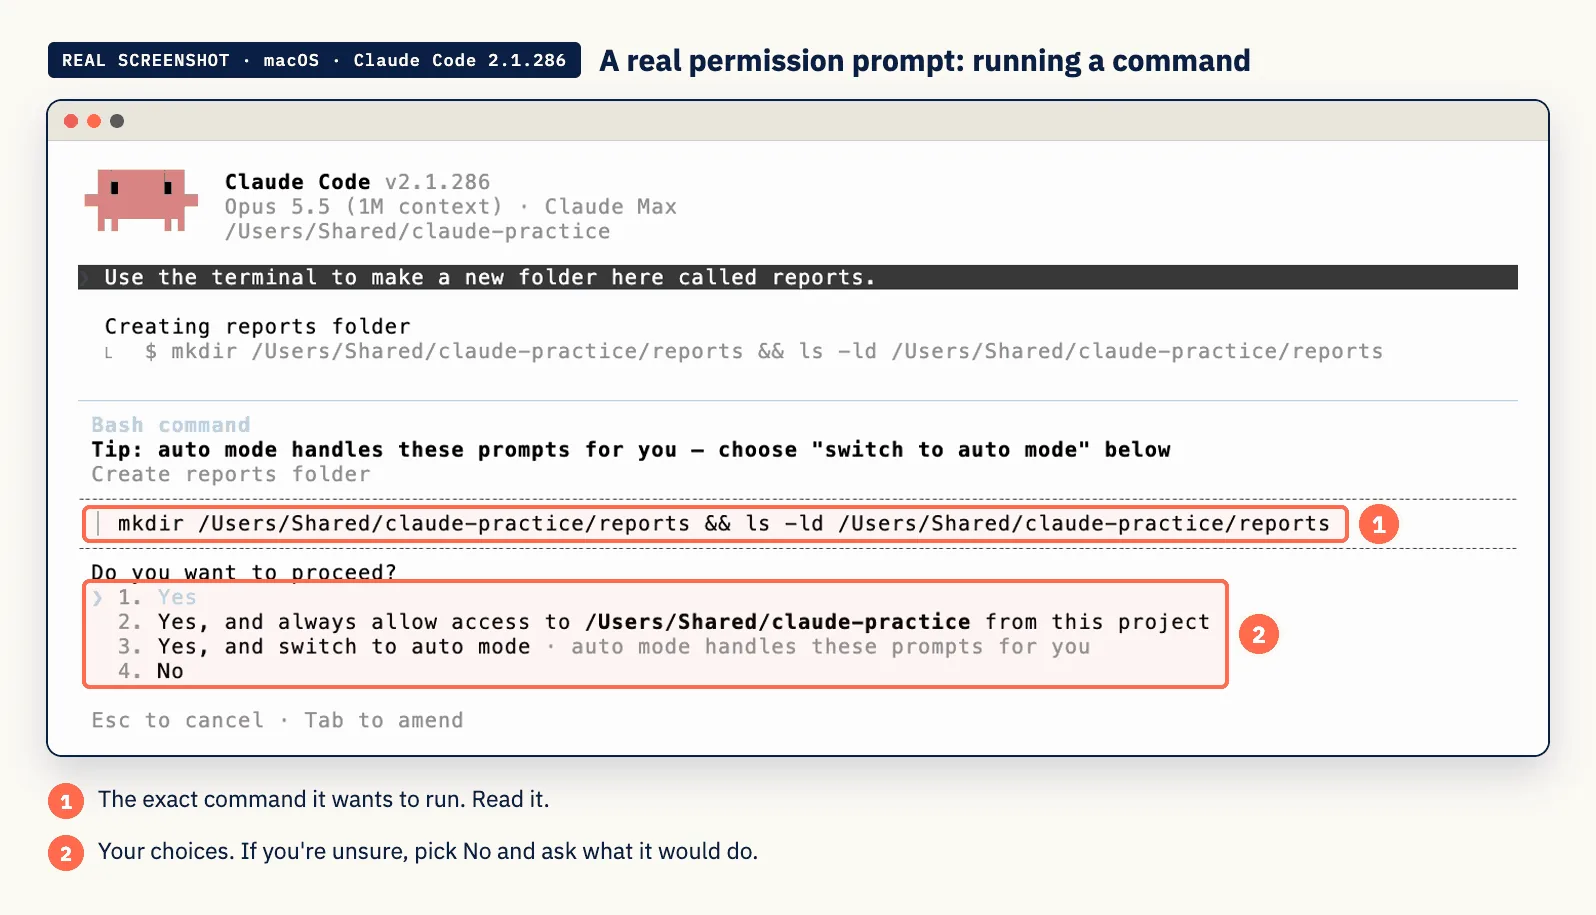
| Option | What it means | When to pick it |
|---|---|---|
| Yes | Do this one thing | You've read it and you're happy |
| Yes, and switch to accept edits | Create and edit files in this folder without asking, for this session | You're working in a practice or project folder and trust the plan |
| Yes, and always allow access to [folder] | Stop asking about this folder in this project | Your own project folder, once you're comfortable |
| Yes, and switch to auto mode | A safety checker approves routine actions for you (see below) | Later. Not in your first week |
| No | Don't do it | Anything you don't understand. Then ask: "explain what that would have done" |
The exact choices change depending on what it's asking for, so read the line each time.
What's auto mode? Anthropic describes it as running "without routine prompts" while "a background classifier checks that they align with your request". It's convenient, but you learn far more, and catch far more, by approving things yourself for the first week. Stay in the default Manual mode until the prompts feel boring.
The golden rule: if you don't understand a prompt, choose No and ask. Claude will explain it in plain words. There is never a penalty for asking.
Plan mode: the single best habit
Before any real job, switch to plan mode. In plan mode Claude reads and thinks, then shows you a plan, and changes nothing until you approve.
Two ways in:
- Type
/planfollowed by your request, or - Press
Shift + Tabuntil the bottom of the screen says plan mode
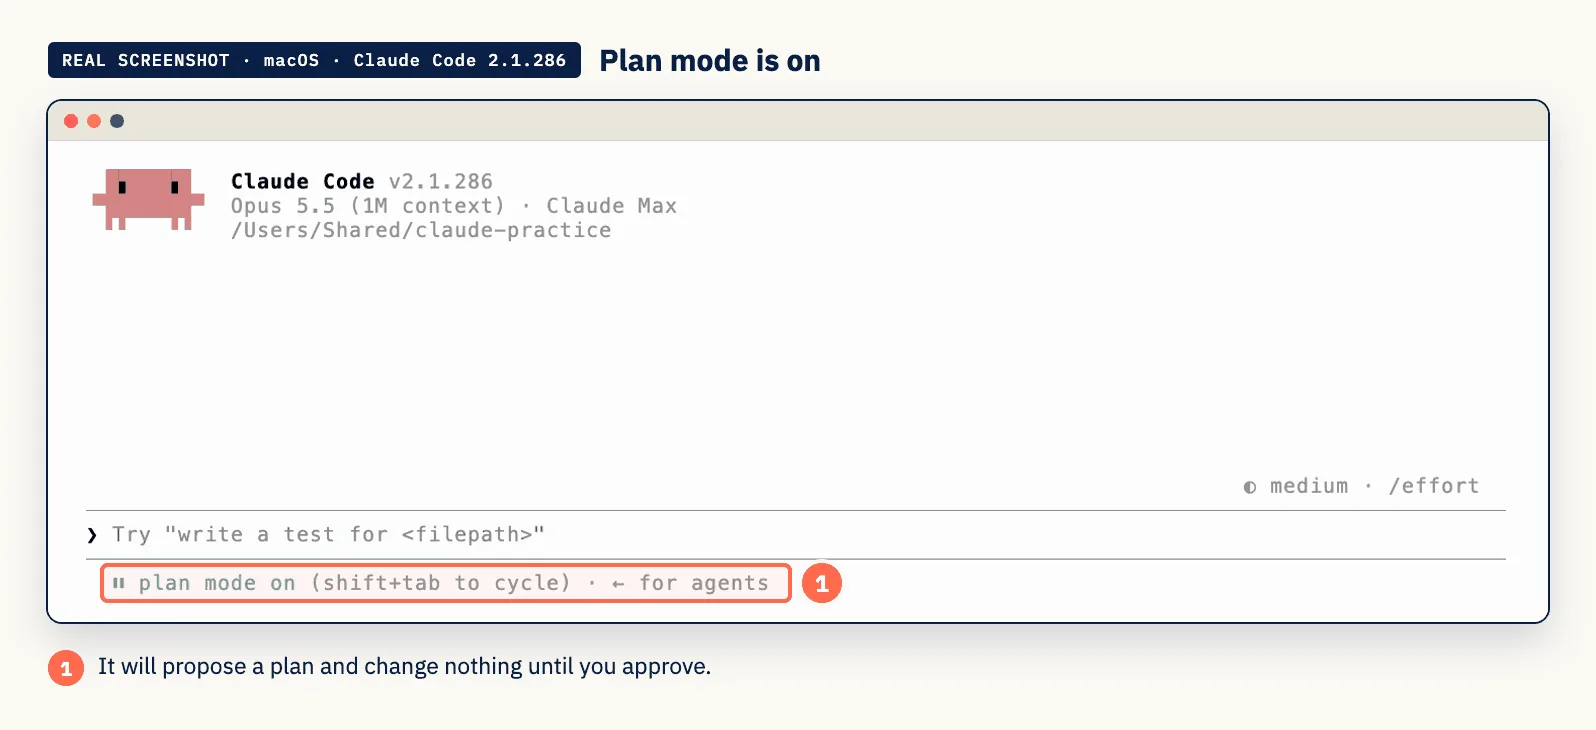
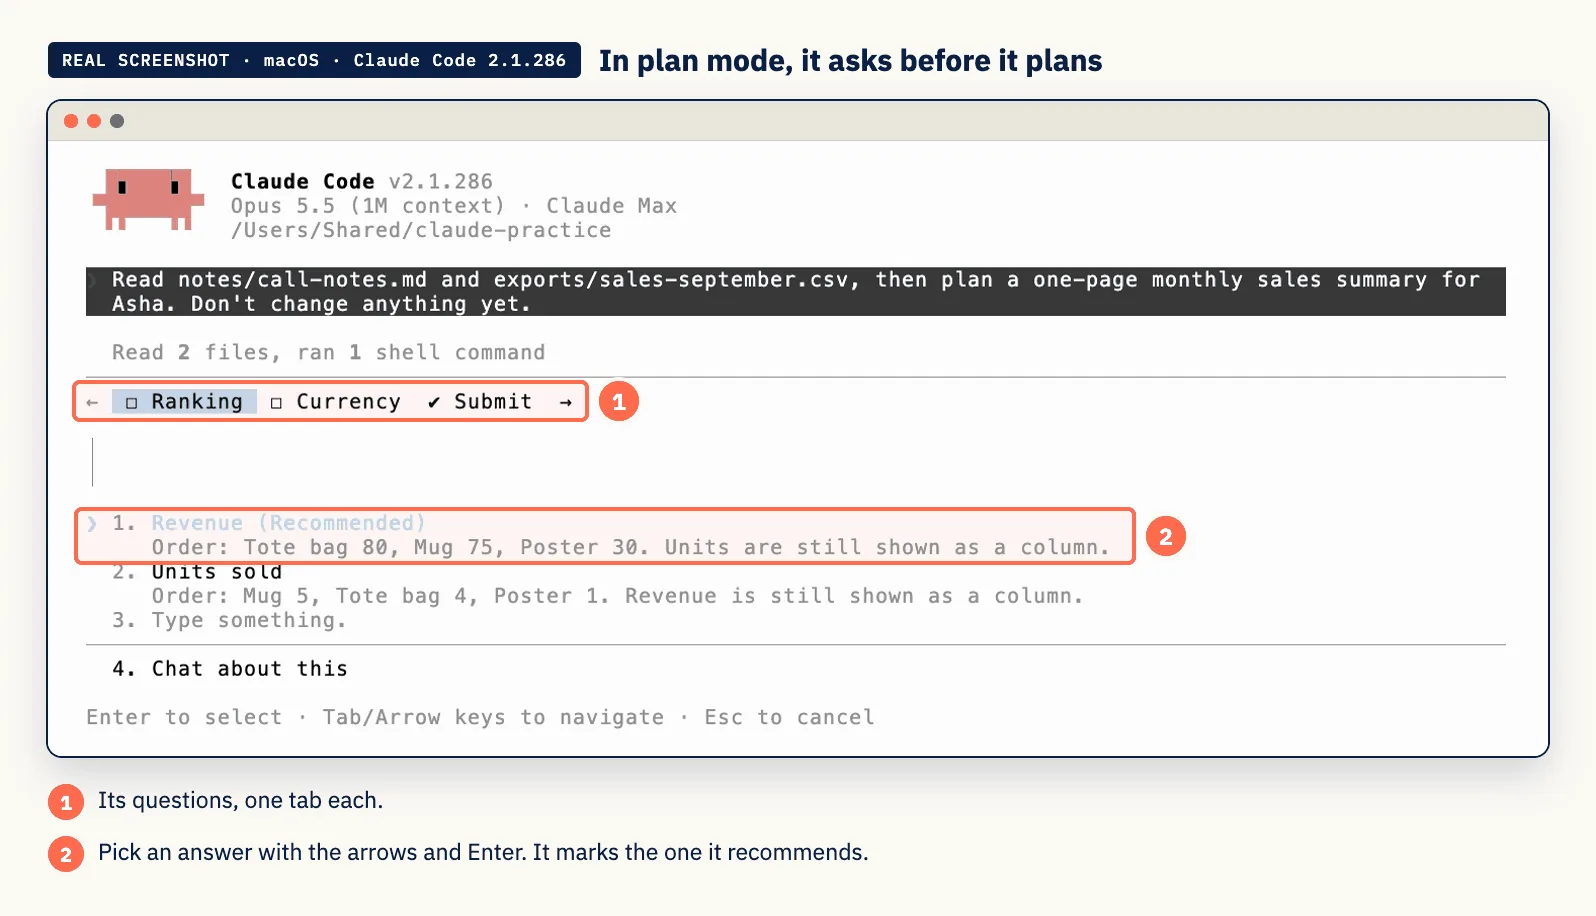
When you give it a job in plan mode, it may ask you a question or two first, then write the plan out and wait:
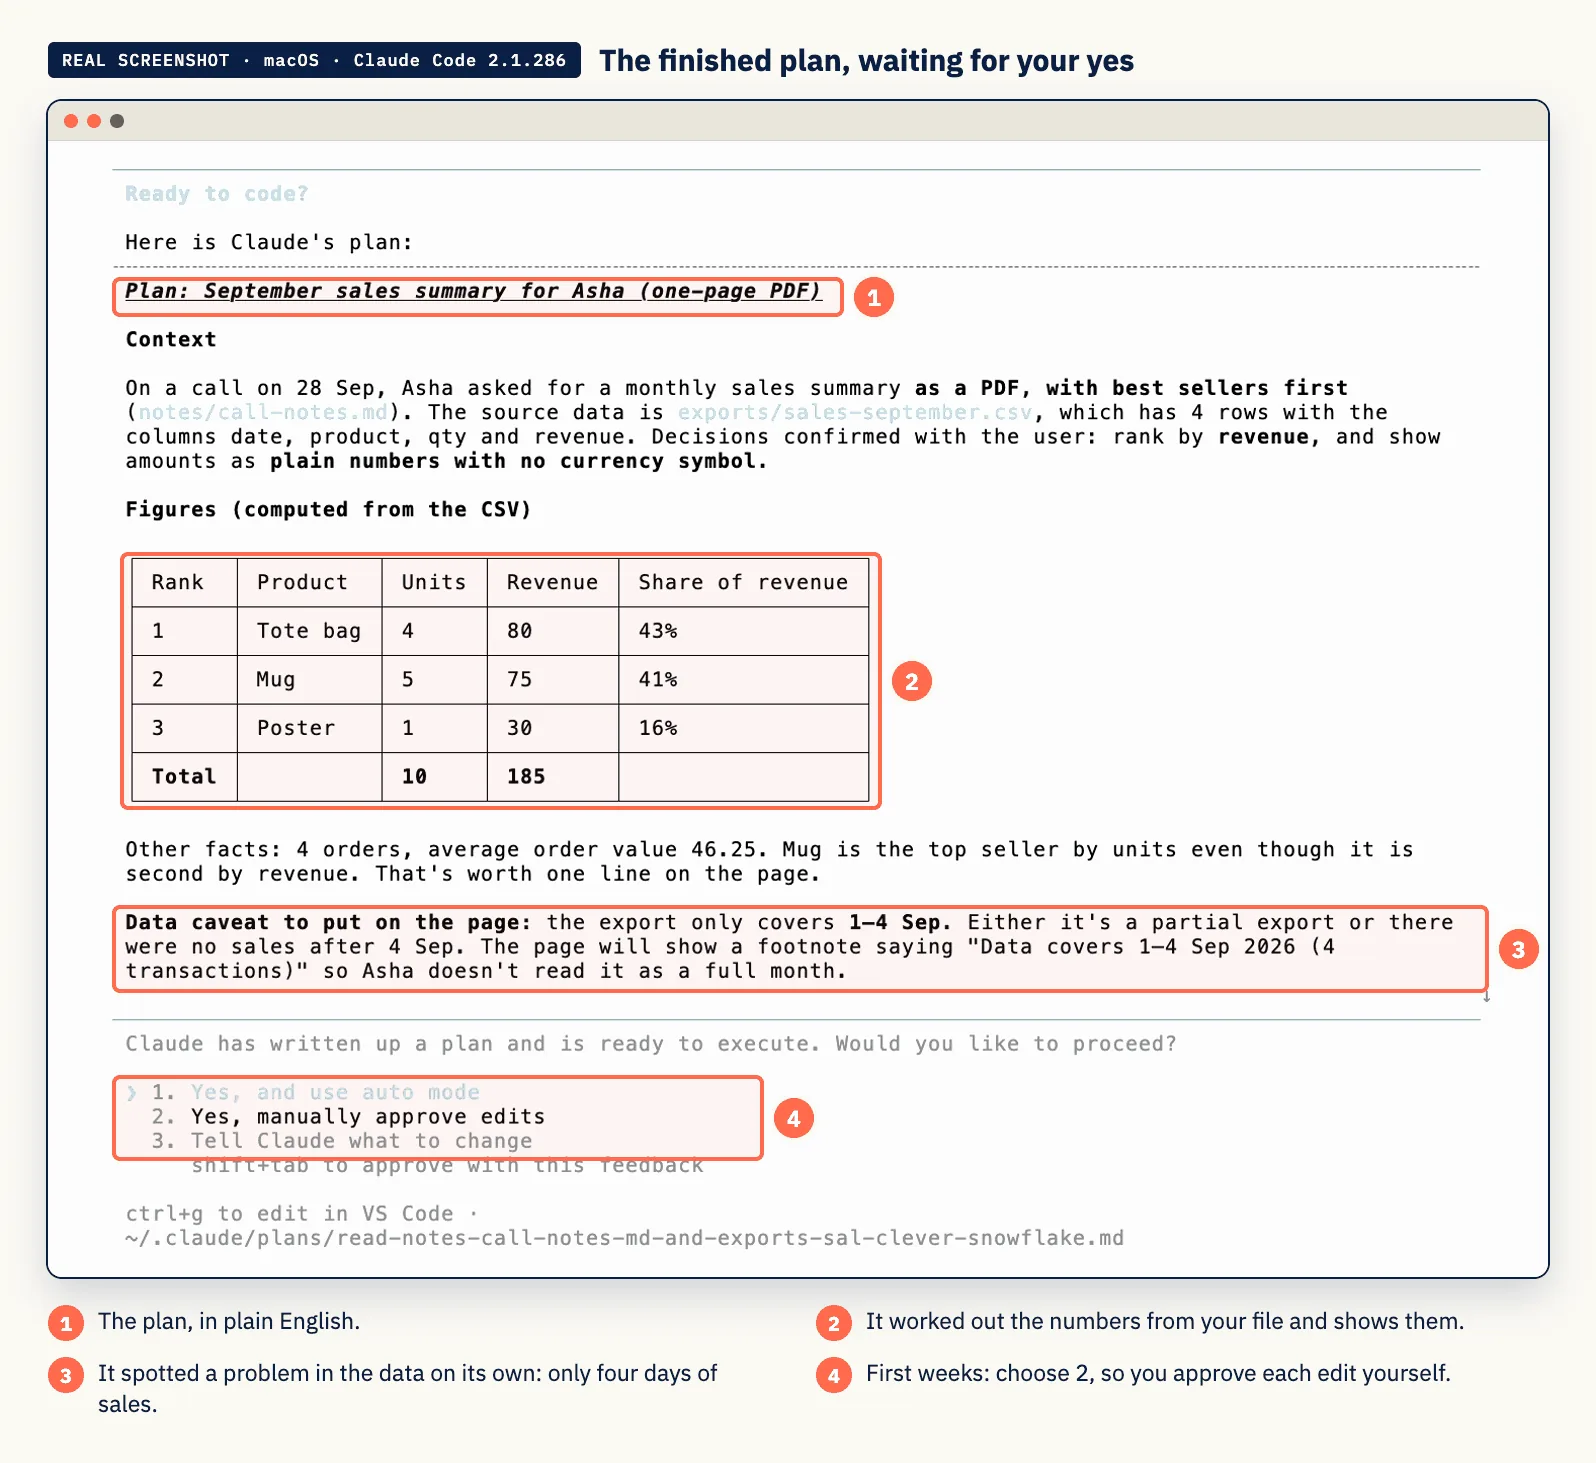
Which option should you pick? In your first weeks, choose "Yes, manually approve edits". You still see and approve every change. "Tell Claude what to change" sends it back to rework the plan.
Then approve the plan, ask for changes, or say no. It's the difference between a contractor who shows you the drawings first and one who starts knocking down walls.
Teach it your rules: CLAUDE.md
Type:
/init
Claude reads the folder and writes a CLAUDE.md file describing it. This is the most
important file you'll own. Whatever you put in it becomes a standing rule, read at the
start of every session in that folder.
Open it (open CLAUDE.md on Mac, notepad CLAUDE.md on Windows) and add your rules.
A good starting set for anyone:
# How to work in this folder

## Verify, don't trust
Re-read any source before summarising it. Never state a number you
haven't just checked. If you can't find something, say so.

## Plan first
For anything beyond a one-line change, propose a plan and wait.

## Never without asking
- Never delete files. Move them to /archive and tell me where.
- Never overwrite an original. Save a new version.
- Never send, publish, post, pay for or deploy anything.

## Done means proven
Don't tell me a task is finished until you've checked the result.
The first rule comes from a popular community post titled "The single best thing I've put in CLAUDE.md" (221 votes on r/ClaudeCode). A reply added the next step: "You can also build out a hook that enforces this behaviour, so you aren't just taking the AI's word for it." Hooks are in Part 7.
Your undo button: git
Claude Code can rewind its own file edits (/rewind, or press Esc twice). But
Anthropic's docs are clear that it doesn't undo everything, such as the effects of
commands it ran. Git is the real undo button, and you don't have to learn it. Just say:
Set up git in this folder and save a snapshot now. From now on, save a
snapshot before any big change, and tell me how to go back if I need to.
Then, whenever something goes wrong: "Go back to the last snapshot."
Your first hour: three things to try
1 · Understand something you've inherited
Explain what's in this folder. What is it, how is it organised, and
what would you look at first if you had to change it? Don't change anything.
2 · A real piece of work, planned first
/plan
Read the notes in /notes and draft a one-page summary in /reports.
Propose the structure first and wait for me.
3 · Something repetitive, saved for next time
Every month I turn the export in /exports into a short report. Do it for
this month. Then save how you did it as a skill, so next month I can just
type the skill's name.
The commands worth learning
Type / in Claude Code to see the full list. These are the ones you'll actually use:
| Command | What it does |
|---|---|
/init |
Creates a CLAUDE.md guide for this folder |
/plan |
Plan mode: it proposes before touching anything |
/rewind |
Goes back to an earlier point, in the conversation and the files (also Esc twice) |
/clear |
Starts a fresh conversation (do this between unrelated jobs) |
/compact |
Summarises the conversation so far to free up room |
/context |
Shows how full its working memory is |
/resume |
Picks up an earlier conversation |
/model |
Switches the AI model |
/effort |
Sets how hard it thinks: low, medium, high, xhigh, max |
/memory |
Edits your CLAUDE.md files and what it remembers |
/permissions |
Controls what it may do without asking |
/skills |
Lists your saved skills |
/mcp |
Shows and signs in to connectors |
/usage |
Shows how much of your plan allowance you've used |
/doctor |
Runs a setup check-up and can fix problems |
/help |
Lists everything |
/exit |
Leaves Claude Code (or press Ctrl + C twice) |
Ending a session: type /exit. To come back to the same conversation later, start
it with claude --continue from the same folder.
Part 4 · One message sets up your whole computer
Here's the part most guides make you suffer through: installing Python, Node.js, Git and the rest by hand, one confusing website at a time.
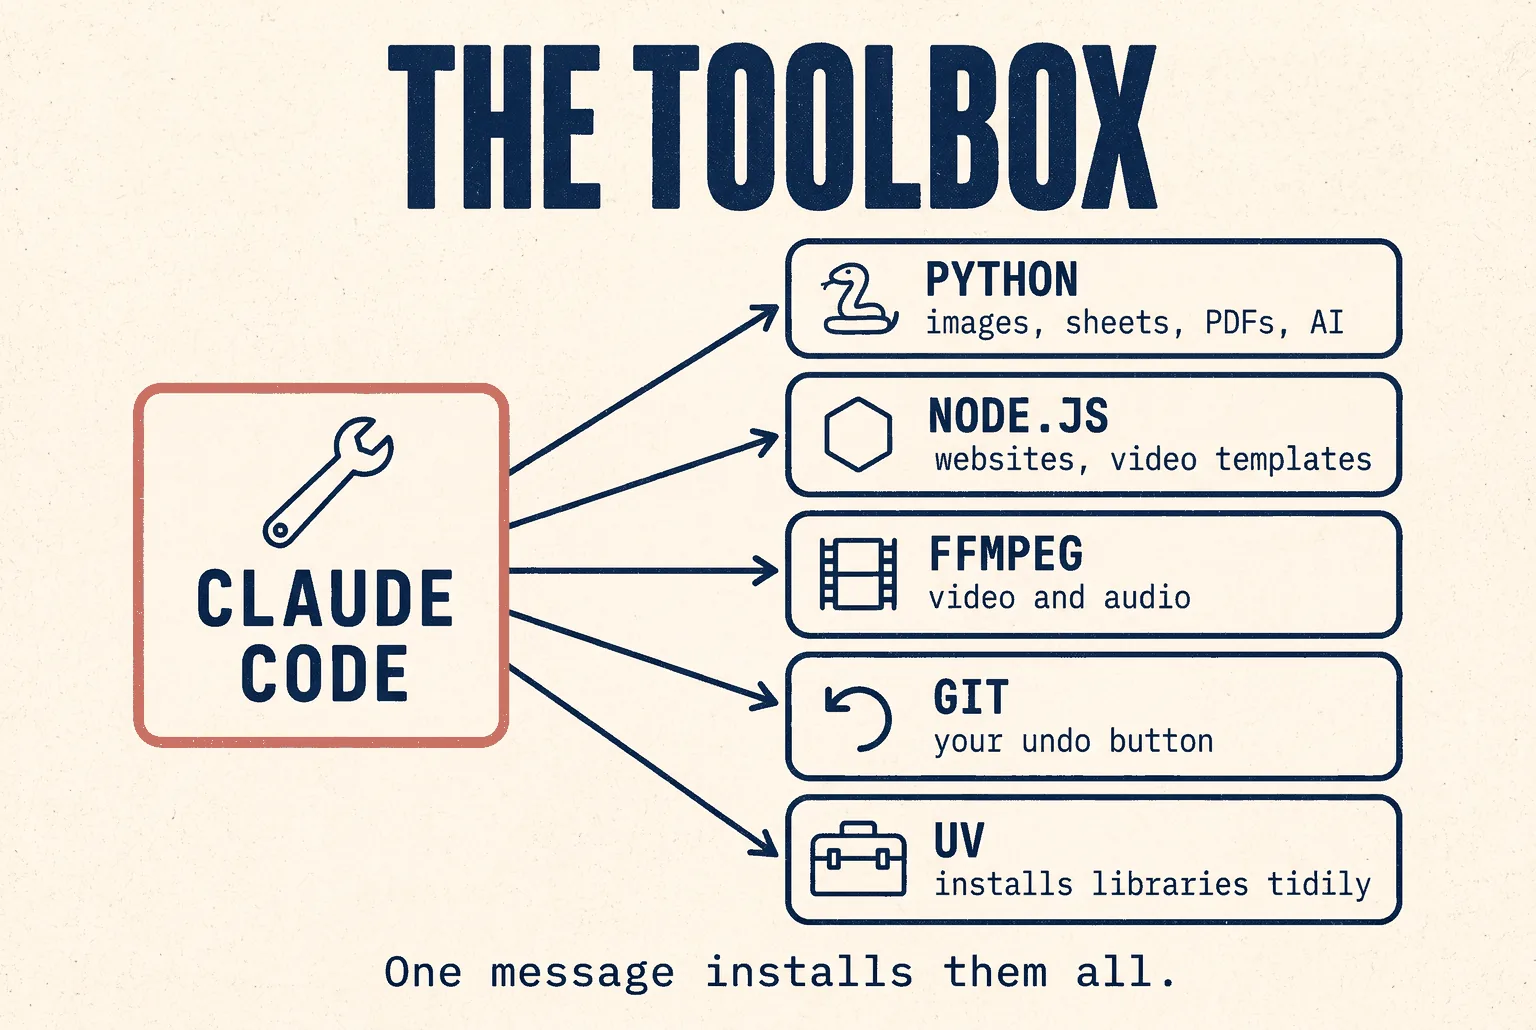
You won't do that. You'll paste one message, and Claude Code installs and tests everything for you, explaining each step in plain English and asking before each install.
First, what are these things?
Think of Claude Code as a brilliant assistant who writes small programs (scripts) to do your jobs. A script needs an engine to run, the way a music file needs a player.
| Tool | Plain English | Who needs it |
|---|---|---|
| Python | The engine for most scripts: images, spreadsheets, PDFs, AI | Everyone, eventually |
| Node.js | The engine for web and video-template tools | Developers, video editors, web work |
| Git | The undo button for your folders | Everyone |
| FFmpeg | The engine behind almost every video tool | Video editors, anyone handling audio or video |
| uv | A fast installer that keeps Python tidy | Everyone (it's how Claude installs libraries safely) |
| Libraries | Ready-made toolkits for scripts (for images, Excel, PDFs and so on) | Installed for you, below |
Mac only: one line first
On a Mac, the installer everything else uses, called Homebrew, needs your Mac password once. Claude Code can't type your password for you (that's a good thing), so paste this one line into Terminal yourself (it's the official line from brew.sh):
/bin/bash -c "$(curl -fsSL https://raw.githubusercontent.com/Homebrew/install/HEAD/install.sh)"
It asks for your Mac password. Typing a password in Terminal shows nothing on screen, not even dots. That's normal. Type it and press Enter. Then follow any "Next steps" lines it prints at the end (it usually asks you to paste two more lines so the terminal can find Homebrew). It takes a few minutes.
Windows users skip this. Windows 10 (version 1809 or later) and Windows 11 already include WinGet, Microsoft's own installer (Microsoft Learn, linked in Sources).
The setup message
Make a folder for the setup, start Claude Code in it, and paste this whole message:
| Mac | Windows |
|---|---|
mkdir ~/claude-setup && cd ~/claude-setup && claude |
mkdir ~\claude-setup; cd ~\claude-setup; claude |
Please set up this computer for me. I'm not technical, so before each step,
explain in one plain sentence what you're about to do and why, and ask
before installing anything.

1. CHECK. See which of these are installed: Git, Python 3, Node.js, FFmpeg,
   and uv. Show me a simple table: tool, installed yes/no, version.

2. INSTALL WHAT'S MISSING.
   - On a Mac, use Homebrew: brew install git python node ffmpeg uv
     (only the missing ones). If Homebrew isn't installed, stop and tell me
     the one line to paste into Terminal myself.
   - On Windows, use winget, one at a time, with
     --accept-source-agreements --accept-package-agreements:
     Git.Git, Python.Python.3.14, OpenJS.NodeJS.LTS, Gyan.FFmpeg, astral-sh.uv.
     Before each one, warn me that a Windows "allow changes" box may pop up
     and that I should click Yes.

3. BUILD MY PYTHON TOOLBOX. Use uv to create a Python 3.14 environment in a
   folder called claude-toolbox in my home folder, and install these
   libraries into it: pillow pandas openpyxl matplotlib requests
   python-dotenv python-docx pypdf reportlab

4. ASK ME MY ROLE, then add the extras for it:
   - video editor: openai-whisper (for subtitles)
   - graphic designer: rembg[cpu] (for background removal)
   - everyone else: nothing extra for now
   Tell me roughly how much disk space each extra needs before installing.

5. TEST EVERYTHING. Run each tool's version check and import every library.
   Show me a final table with a tick or a cross for each one.

6. REMEMBER IT. Add a section called "My computer" to my personal
   CLAUDE.md (~/.claude/CLAUDE.md), listing what's installed and these rules:
   - For Python jobs, use the claude-toolbox environment.
   - If a job needs a new library, install it into claude-toolbox with uv.
   - Never use sudo. Never install anything system-wide without asking me.

7. If a new tool isn't found after installing, tell me whether I need to
   close and reopen the terminal, and exactly how to get back to you after.
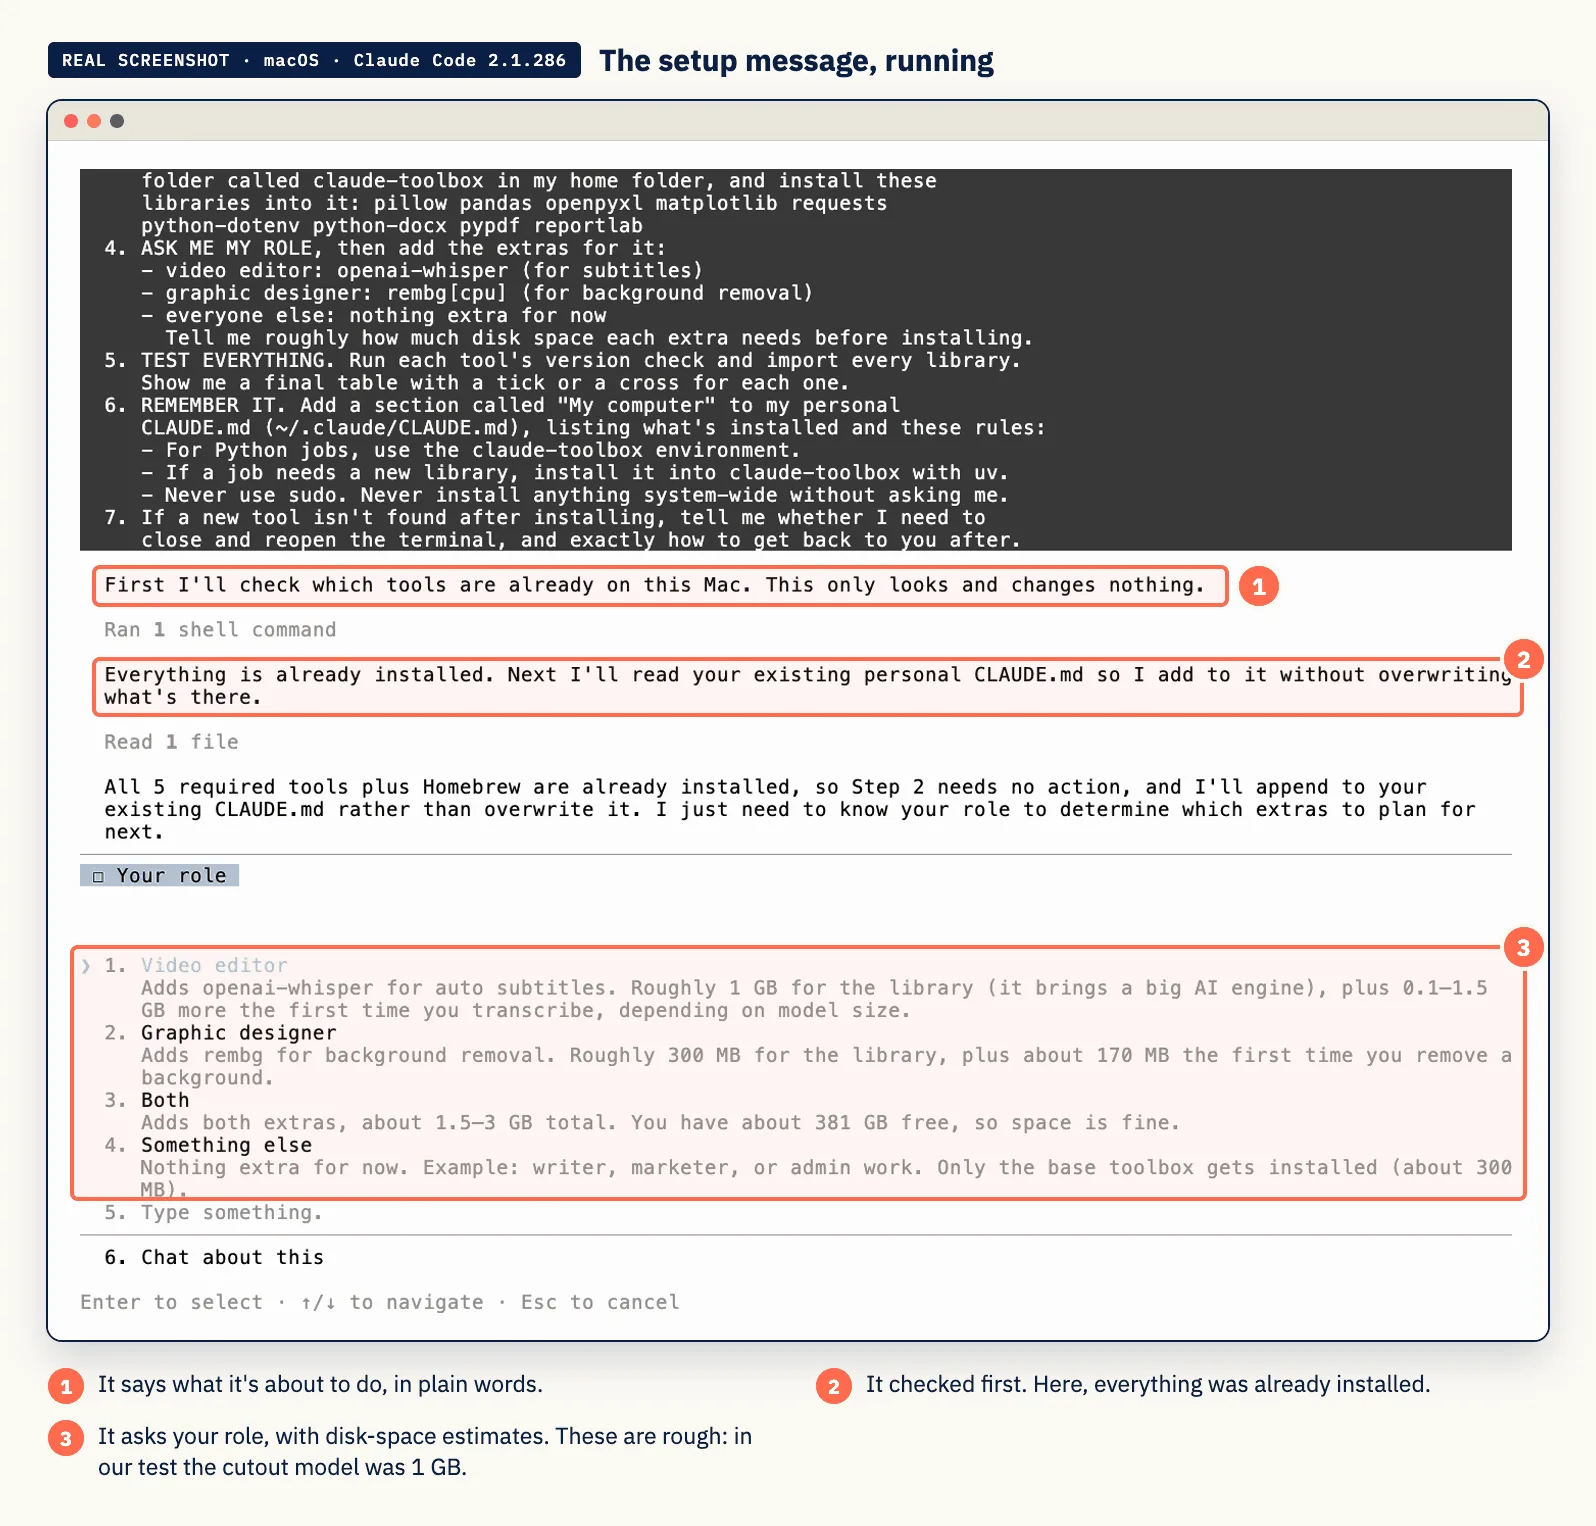
What will happen
- It checks first. You'll see a table of what's already there. Many computers already have Git or Python.
- It asks before each install. Read the line, choose Yes. On Windows, a blue "Do you want to allow this app to make changes to your device?" box may appear. That's Windows checking with you. Click Yes.
- It may ask you to restart the terminal. New programs often only appear in a new
terminal window. When it says so: type
/exit, close the window, open a new one, go back to the folder (cd ~/claude-setup), and typeclaude --continue. It picks up where it left off. - The extras are big. We tested both on 1 October 2026. Whisper (subtitles) brought the toolbox to about 1.1 GB. Background removal downloads a 1 GB model the first time you use it. Make sure you have room.
Why a "toolbox" and a note in CLAUDE.md?
Two reasons, both about you never having to think about this again:
- The toolbox is one tidy place for every library Claude installs. Nothing gets scattered around your system, and nothing can break the Python your Mac or Windows relies on.
- The CLAUDE.md note means every future session, in any folder, already knows what's installed and where. You'll never be asked "do you have Python?" again. Need a new library next month? Claude installs it into the toolbox by itself, and asks you first.
Why Python 3.14 and not the newest version? A brand-new Python release sometimes breaks popular libraries for a few months. 3.14 is current, and we tested every library in the setup message on it.
Prefer to install things yourself?
Here are the exact commands Claude would run, so you can see there's no magic.
| Tool | Mac (Homebrew) | Windows (WinGet) |
|---|---|---|
| Git | brew install git |
winget install --id Git.Git -e --source winget |
| Python | brew install python |
winget install -e --id Python.Python.3.14 |
| Node.js | brew install node |
winget install -e --id OpenJS.NodeJS.LTS |
| FFmpeg | brew install ffmpeg |
winget install -e --id Gyan.FFmpeg |
| uv | brew install uv |
winget install --id=astral-sh.uv -e |
Check each one in a new terminal window:
| Tool | Check command | You should see |
|---|---|---|
| Git | git --version |
a version number |
| Python | python3 --version (Mac) / python --version (Windows) |
Python 3. followed by numbers |
| Node.js | node -v and npm -v |
v followed by numbers |
| FFmpeg | ffmpeg -version |
a long block starting ffmpeg version |
| uv | uv --version |
uv followed by numbers |
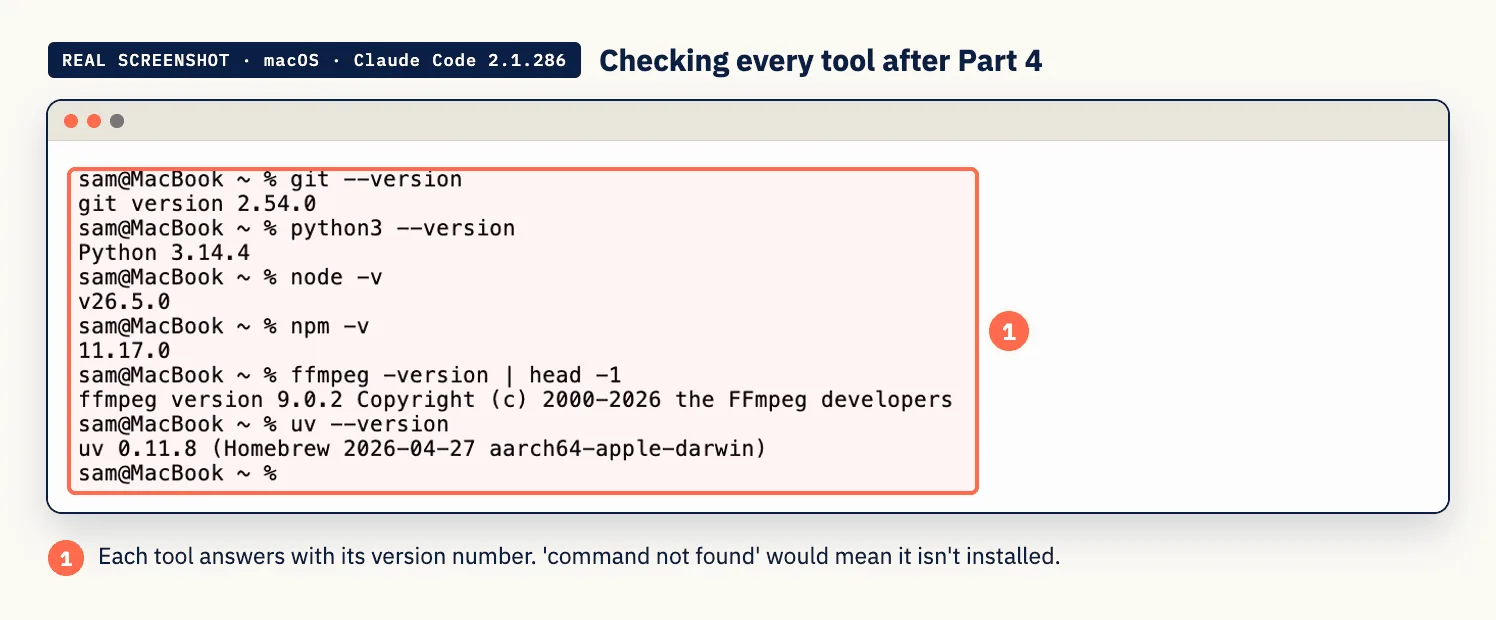
Node.js note: WinGet installs the LTS version ("long-term support", the stable one). Homebrew installs the newest version. Both work for everything in this guide.
Part 5 · API keys and .env files, explained like you're new
This part opens up the fun stuff: generating images, using other AI models, and connecting scripts to online services. Read it slowly once. It's the most important safety lesson in the guide.
What an API is
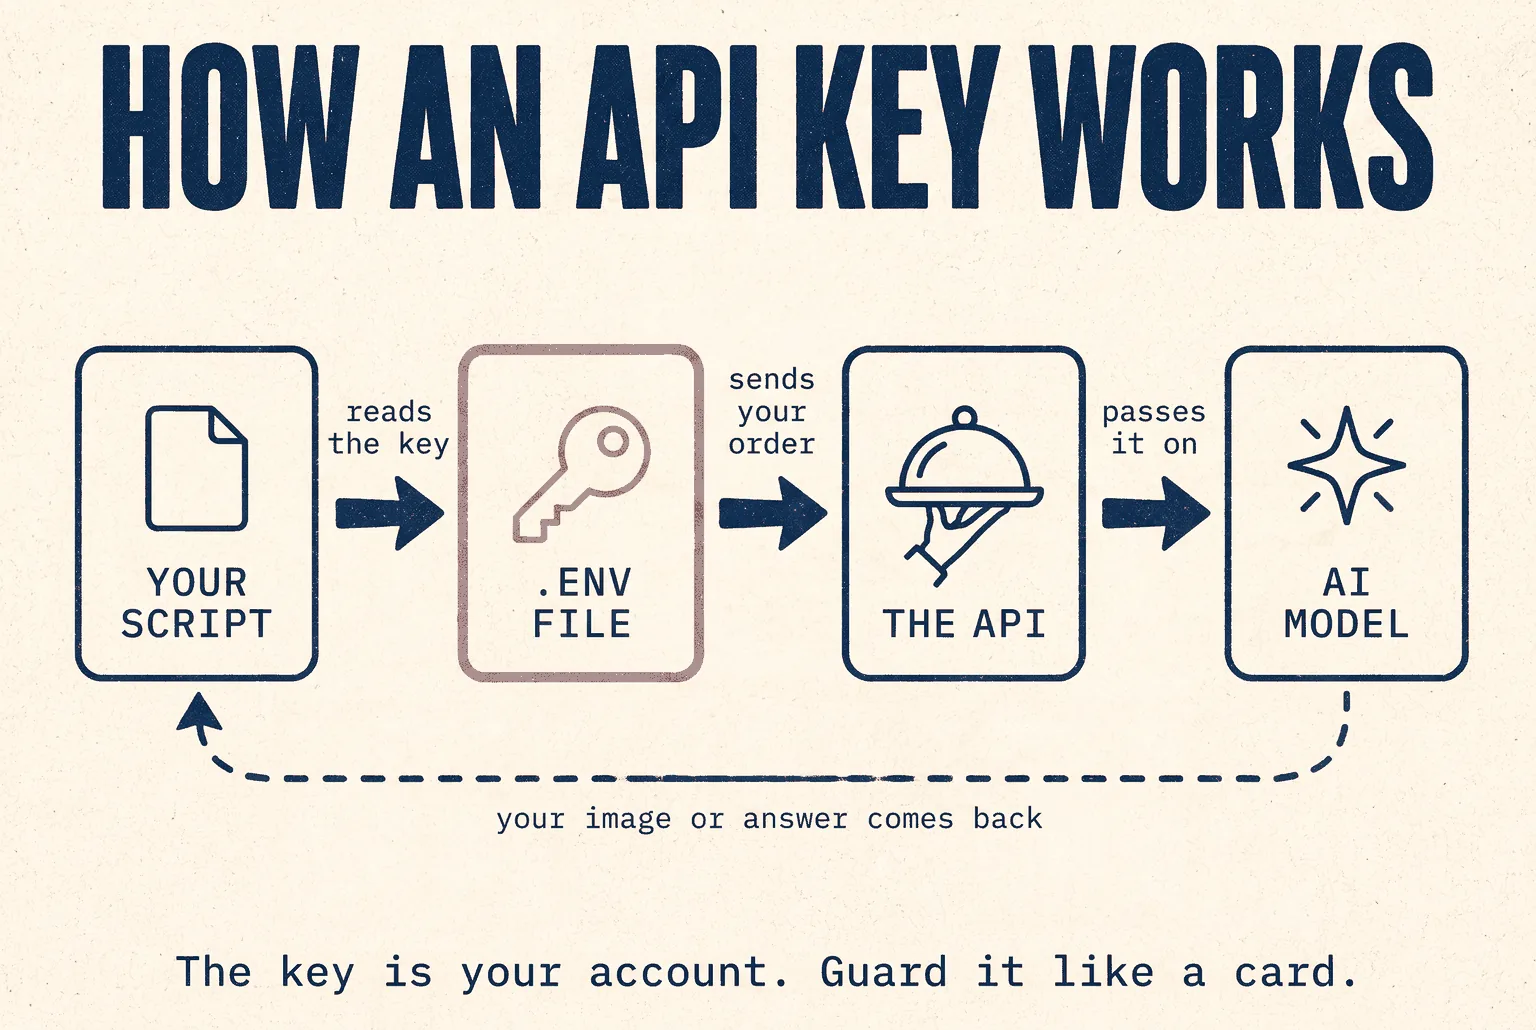
An API is a way for one program to ask another program to do something.
Think of a restaurant. You (your script) don't walk into the kitchen (the AI company's servers). You give your order to the waiter (the API), who brings back your food (the image, the text, the answer).
What an API key is
An API key is a long password that says "this order is from me, charge my
account." It looks something like sk-or-v1- followed by a long string of letters and
numbers.
Treat every API key like a credit card number:
- ✅ Anyone who has it can spend your money.
- ✅ Store it in one private place (your
.envfile, below). - ❌ Never paste it in a chat, an email, a document, a screenshot or a public website.
- ❌ Never send it to Claude in the chat box. Put it in the file yourself (shown below).
What a .env file is
A .env file (pronounced "dot env") is a tiny, plain text file that lives in your
project folder and holds your keys. Each line is one key:
OPENROUTER_API_KEY=sk-or-v1-your-key-here
IMAGEROUTER_API_KEY=your-key-here
The rules are strict and simple:
- One key per line:
NAME=value - No spaces around the
= - No quotes needed
- The name is in CAPITALS with underscores
Scripts that Claude writes read the key from this file, so the key never appears in the script itself. That way you can share the script safely, and the key stays home.
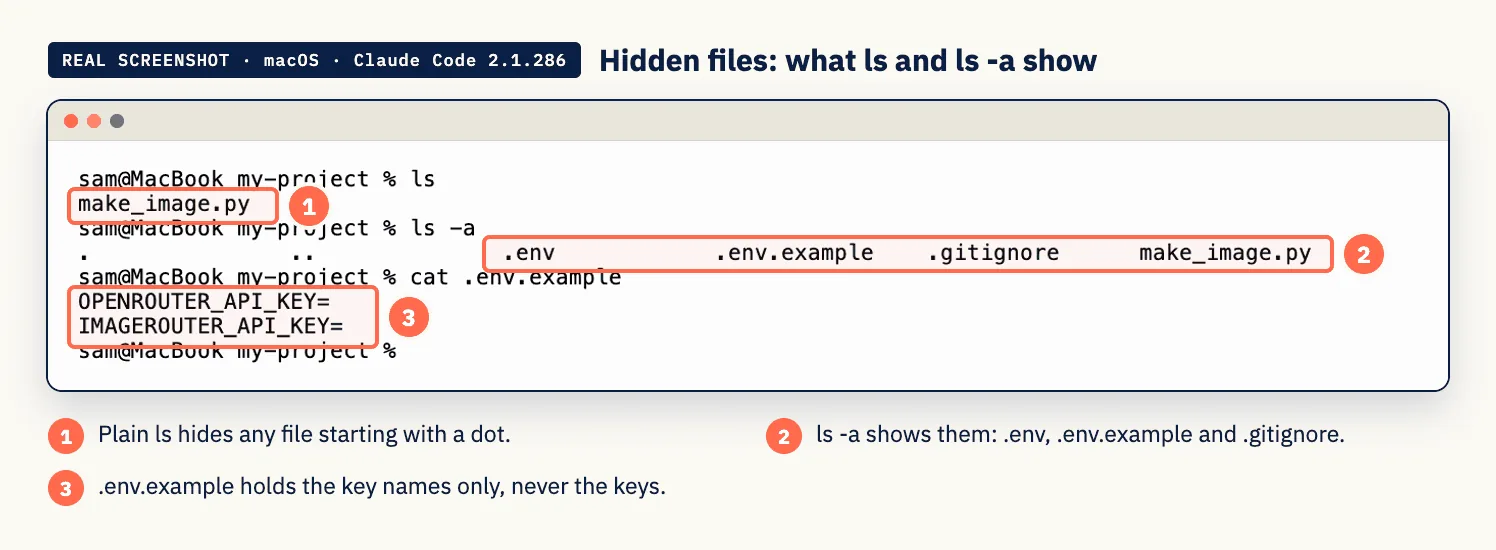
Why you can't see it (hidden files)
Any file starting with a dot is hidden by default.
| How to see hidden files | |
|---|---|
| Mac (Finder) | Press Cmd + Shift + . (full stop). Press again to hide them |
| Windows (File Explorer) | View menu, then Show, then tick Hidden items |
| Terminal | ls -a (Mac) or ls -Force (Windows PowerShell) |
The safe way to set up a .env file
Do it in this order. Claude makes the empty file. You paste the key.
1. Ask Claude to prepare it:
Create a .env file in this folder with a blank line for OPENROUTER_API_KEY
and one for IMAGEROUTER_API_KEY. Also create a .env.example with the same
names and no values, and a .gitignore that includes .env, so the real
file can never be uploaded anywhere. Don't ask me for the keys.
2. Open the .env file in a plain text editor and paste your key after the =.
| Mac | Windows |
|---|---|
open -e .env (opens TextEdit) |
notepad .env |
Save and close. Done.
3. Tell Claude it's ready: "The key is in .env. Never print it."
Why .env.example and .gitignore? The .gitignore tells Git (your undo tool)
to never save or upload the .env file. GitHub's own documentation warns that keys
committed into code "become targets for unauthorized access". The .env.example shows
anyone (including future you) which keys the project needs, without the keys.
Lock it down further (optional, recommended)
Anthropic's own settings docs show how to stop Claude Code reading .env files at all.
Scripts it writes can still use the key when they run. Ask:
Add a deny rule to my Claude Code settings so you can never read .env
files directly: Read(./.env) and Read(./.env.*).
If a key ever leaks
- Go to the website you got it from and delete (revoke) the key right away.
- Make a new one and paste it into
.env. - Check your billing page for spending you don't recognise.
Speed matters more than anything else here. A revoked key is a useless key.
Set a spending limit on every key
Both services below let you put a credit limit on a key. OpenRouter's docs say it plainly: "We recommend setting a credit limit on every key." Do it. A $5 limit on a learning key means a runaway script can cost you $5, not $500.
OpenRouter: one key, hundreds of AI models
What it is: in OpenRouter's own words, it "gives you access to hundreds of AI models through a single API endpoint." One account, one key, and your scripts can use models from OpenAI, Google, Anthropic, Meta and many others. It can generate images too.
Why you'd want it: to compare models, to use a cheaper model for bulk jobs, or to use a model Claude doesn't offer.
How it charges: pay as you go. You buy credits, and OpenRouter says it doesn't mark up
model prices. There's a 5.5% fee when you buy credits ($0.80 minimum). Some models
have a free version (their names end in :free), limited to 20 requests a minute and 50
a day, or 1,000 a day once you've bought at least $10 of credits.
Get your key, step by step:
- Go to openrouter.ai and sign up.
- Add a small amount of credit (start with $5).
- Go to openrouter.ai/settings/keys and click to create a key.
- Give it a name (like
my-laptop) and set a credit limit. - Copy the key (it starts with
sk-or-v1-). You may only see it once. - Paste it into your
.envasOPENROUTER_API_KEY=...
Your first OpenRouter job:
/plan
Write a small Python script, using my claude-toolbox, that reads
OPENROUTER_API_KEY from .env (never print it) and sends this question to
two different models on OpenRouter: [the cheapest good model you'd suggest]
and [a :free model]. Save both answers side by side in answers.md, with
what each one cost. Tell me which models you picked and why before you run it.
Question: "Write three headline options for a bakery's Diwali offer."
ImageRouter: one key, the best image models
What it is: one "OpenAI-compatible API" (in plain English: a standard way of asking for images) that gives you hundreds of image and video models: GPT Image 2, Google's Nano Banana, FLUX, Seedream and more, all with one key. It's what we use at Massive Impact for our own covers and figures.
How it charges: pay as you go, no subscription. 3 free images a day, with no signup. Paid images are a few cents each. We ran the exact "first image" prompt below on 1 October 2026 with GPT Image 2: it cost $0.0236 and took 37 seconds. Prices move, so check before a big batch.
Get your key, step by step:
- Go to imagerouter.io and sign up.
- Add a few dollars of credit if you want more than the free images.
- Go to imagerouter.io/api-keys and create a key.
- Paste it into your
.envasIMAGEROUTER_API_KEY=...
Your first AI image, in one message:
/plan
Using my claude-toolbox, write a script that reads IMAGEROUTER_API_KEY
from .env (never print it) and generates one image with ImageRouter, using
their images/generations endpoint and the model openai/gpt-image-2.
Prompt: "A flat illustration of a cosy bookshop at night, warm light,
no text". Save it as first-image.png and open it for me. Tell me what it
cost before you run it.

Which model? ImageRouter's free test model test/test costs nothing and returns a
dummy image, which is perfect for checking your setup works. For real work:
GPT Image 2 for clean layouts, products and text in images; Gemini models for
people and faces; FLUX for textures and backgrounds. When in doubt, ask Claude:
"Which ImageRouter model is best for [job], and what does it cost?"
Other keys you might meet later
You'll set these up the same way: get the key from the service's dashboard, paste it into
.env, tell Claude its name.
| Service | What for |
|---|---|
| Anthropic API (console.anthropic.com) | Using Claude models inside your own scripts and apps |
| OpenAI | GPT models and OpenAI's image models directly |
| Google AI Studio | Gemini models directly |
| ElevenLabs | AI voiceovers |
One warning about Anthropic API keys: if a key named ANTHROPIC_API_KEY is set in
your system, Claude Code itself will ask to use it, and that bills by usage instead of
your monthly plan. Keep that key in a project .env file, not in your system settings.
Part 6 · Your role chapter
Everything so far was the shared foundation. From here, jump to your own chapter. Each one follows the same shape:
- What Claude Code is genuinely good at in your job
- What to install first (it's always a short list)
- Real projects, with the exact words to type
- How to save your best project as a skill, so it's one command next time
- The watch-outs that are specific to your work
Every prompt in this part is copy-paste ready. Text in [square brackets] is
yours to replace. Keep everything else as written the first time, then adjust.
Jump to: Graphic designers · Video editors · Writers · Business owners · Media buyers · Developers
Graphic designers
The short version: Claude Code won't replace your eye. It replaces the boring 60% of the job around your eye: resizing, exporting, renaming, converting, compressing, and making the first rough round of ideas.
What it's good at for you
| Job | What you'd type |
|---|---|
| One design, every size | "Make this banner in all six ad sizes, without stretching anything" |
| Batch export and convert | "Turn every PNG in /exports into a web-ready WebP under 200 KB" |
| First-round concepts | "Generate 8 rough mood directions for a coffee brand with ImageRouter" |
| Background removal | "Cut the background out of every product photo in /products" |
| Brand kits | "Pull the colour palette from this logo and make me a one-page brand sheet" |
| Contact sheets | "Make a PDF contact sheet of every image in this folder, with file names" |
| File housekeeping | "Rename these 300 files to client-project-001 style and sort them by type" |
Install first
- ✅ Python (Part 4). Almost every image job runs on it.
- ✅ An ImageRouter key in your
.env(Part 5), only if you want to generate images. - ⚪ Nothing else. Claude installs the small image libraries it needs (it'll ask first).
Project 1 · One design, every ad size
Put your master file in a folder called master. Then type:
/plan
I have a master design in /master. Make a version for each of these sizes
and save them in a new folder called /sizes:
- 1080x1080 (square)
- 1080x1350 (portrait)
- 1080x1920 (story)
- 1200x628 (link ad)
- 1920x1080 (landscape)
Never stretch or squash the design. If the shape doesn't fit, extend the
background colour instead of cropping the important part. Name each file
with its size. Show me the plan first, then write a small Python script I
can reuse next time.
How to check it: open the /sizes folder and look at every file. Ask for a fix in
plain words: "The logo is too close to the edge on the story size. Give it more room."
Project 2 · Generate first-round concepts
This needs the ImageRouter key from Part 5.
/plan
Using my claude-toolbox, read my ImageRouter key from the .env file (never
print it). Write a script that generates 6 images from the prompt below, using the model
[openai/gpt-image-2], and saves them in /concepts with numbered names.
Prompt: [a flat editorial illustration of a coffee cup on a cream background,
navy and coral palette, no text]
Before you run it, tell me roughly what it will cost.
Why "tell me what it will cost"? Every generated image is charged to your ImageRouter credit. Asking first builds a habit that protects your wallet.
Project 3 · Web-ready exports
Take every image in /exports. Make a copy of each as WebP in a new folder
/web, under 200 KB each, longest side 2000 pixels. Never touch the
originals. Then give me a table: file name, old size, new size.
Project 4 · A brand sheet from a logo
Look at logo.png. Pull out its main colours, give each one a HEX and RGB
value, and suggest two supporting colours that work with them. Build a
one-page brand sheet as an HTML file I can open in my browser, and a PDF
copy of it.
Project 5 · Background removal in bulk
Using rembg in my claude-toolbox, remove the background from every photo in
/products and save transparent PNGs in /cutouts. Keep the originals. Show me the three hardest ones first
so I can check the edges before you do the rest.
Notice the last line. "Show me the hardest ones first" is a designer's habit worth keeping: check the risky output on a small batch before a big one.
First run is slow. rembg downloads its cutout model (about 1 GB, in our test on 1 October 2026) the first time. After that it's quick.
Connect your design tools
- Figma. Figma runs an official MCP server (a connector that lets Claude read your
design files, and now write to the canvas too). Paste this into your terminal, then
type
/mcpinside Claude Code to sign in:
How much you can use it depends on your Figma seat: Figma's docs list up to 20 calls a month on the Starter plan, and far more on paid Dev or Full seats.claude mcp add --transport http figma https://mcp.figma.com/mcp - Canva. Canva's AI Connector works with Claude on every Canva account, including Canva Free. Start from canva.com/ai-connector and choose Connect in Claude. Brand templates need a paid Canva plan.
Save it as a skill
Once Project 1 works, type:
Save what we just did as a skill called ad-sizes, so next time I can type
/ad-sizes and give you a master file.
Watch-outs for designers
- ⚠️ Check every word inside a generated image. Models are good at text now, but "good" isn't "proofread". Read it letter by letter before a client sees it.
- ⚠️ Licensing. Read the terms of the model you generate with before you use the output commercially. Don't generate real people's faces or other brands' logos.
- ⚠️ Never let it overwrite originals. Every prompt above says "new folder" for a
reason. Put that rule in your
CLAUDE.md(Part 3). - ⚠️ Colour. Scripts usually work in RGB. Print work in CMYK still needs your own proof in your own design software.
Video editors
The short version: Claude Code is the assistant who does the render-queue chores at 3am. It runs FFmpeg for you (the free engine behind most video tools), so you get conversions, subtitles, cut-downs and proxies without learning a single FFmpeg flag.
What it's good at for you
| Job | What you'd type |
|---|---|
| Compress for web or WhatsApp | "Make this 2 GB export small enough to send on WhatsApp" |
| Subtitles | "Make English subtitles for every video in /interviews" |
| Vertical cut-downs | "Make a 9:16 version of this 16:9 video, keep the speaker centred" |
| Find the best moments | "Read the transcript and find five 30 to 60 second clips that work alone" |
| Proxies | "Make lightweight edit proxies for all the 4K footage in /raw" |
| Organise footage | "Rename every clip by the date and time it was shot" |
| Thumbnails and GIFs | "Pull a frame every 10 seconds so I can pick a thumbnail" |
| Templated videos | "Turn these 20 quotes into 20 captioned square videos with our brand colours" |
Install first
- ✅ FFmpeg (Part 4). Non-negotiable for video.
- ✅ Python (Part 4), for subtitles and transcripts.
- ⚪ Node.js (Part 4), only for templated videos with Remotion.
Project 1 · Compress without guessing
Compress interview-final.mp4 so it's under 100 MB and still looks good on a
phone. Save it as interview-final-small.mp4, never touch the original.
Before you run anything, show me the FFmpeg command and explain each part
in one line.
Why ask it to explain the command? You'll learn FFmpeg by accident. In a month you'll read these commands like a recipe.
Project 2 · Subtitles for a whole folder
/plan
For every video in /interviews, make an English subtitle file (.srt) with
the same name as the video. Use the Whisper in my claude-toolbox, running
on my own computer, so nothing is uploaded. Then make a second copy of each video with the subtitles burned
in, white text with a dark outline, in /subtitled.
How to check it: open each .srt file in your editor and scan for names and
jargon. Speech-to-text gets names wrong more than anything else. Tell Claude the right
spellings once and ask it to fix every file.
Project 3 · Vertical versions for Reels and Shorts
Make a 9:16 vertical version (1080x1920) of every video in /landscape.
Keep the main subject centred. Save them in /vertical. Show me the first
one before you do the rest.
Project 4 · Let the transcript find the clips
/plan
Transcribe podcast-ep12.mp4. Then read the transcript and find the five
strongest moments that make sense on their own, each 30 to 60 seconds.
For each one give me: the start and end time, a one-line hook, and why
it works. Wait for me to approve, then cut those five clips into /clips.
Project 5 · Templated videos at scale
For repeated formats (quote cards, product spotlights, captioned clips), Claude can build a small video template with Remotion, a tool that makes videos from code. You never look at the code. You give it a spreadsheet and get videos back.
Licence check: Remotion is free for individuals and companies of up to 3 people, including commercial use. Bigger companies need Remotion's paid company licence.
/plan
I want 20 square quote videos, 10 seconds each, from quotes.csv (columns:
quote, name). Navy background, cream text, our logo bottom-right from
logo.png. Use Remotion. Make ONE sample first and show me before you make
the other 19.
Save it as a skill
Save the subtitle workflow as a skill called subtitles. It should take a
folder name, make .srt files, and ask before burning them in.
Watch-outs for video editors
- ⚠️ Work on copies. Put "never modify files in /raw" in your
CLAUDE.md. - ⚠️ Disk space. Proxies and re-encodes eat space fast. Ask "how much disk space will this need?" before a big batch.
- ⚠️ Long jobs. Encoding takes real time. Claude can run it in the background and tell you when it's done, so you can keep working.
- ⚠️ Music and footage rights. Automation makes it easy to publish at volume, which also makes it easy to publish something you don't have the rights to.
Writers
The short version: Claude Code is the best writing room you've ever had, because it lives in a folder. Your style guide, your research, your drafts and your notes all sit together, and it reads all of them every time. No more pasting your brand voice into a chat window for the 400th time.
What it's good at for you
| Job | What you'd type |
|---|---|
| Hold your voice | A CLAUDE.md style guide it follows every session |
| Brief to outline to draft | "Turn this brief into an outline. Wait for me. Then draft section 1." |
| Consistency checks | "Check all 14 chapters for name, date and spelling inconsistencies" |
| Fact-checking | "List every factual claim in this draft and find a source for each one" |
| Repurposing | "Turn this article into a newsletter, five LinkedIn posts and a video script" |
| Editing passes | "Cut this to 800 words without losing any of the examples" |
| Formats | "Export the final draft as a Word document and a PDF" |
Install first
- ✅ Nothing, to start. Writing work needs no extra installs.
- ⚪ Anthropic's document skills (Part 7) if you want polished Word and PDF exports. Your toolbox from Part 4 can already make basic ones.
Project 1 · Set up your writing room
Make a folder like this (Claude can make it for you):
my-writing/
├── CLAUDE.md          your voice and rules
├── research/          sources, notes, interviews
├── drafts/            work in progress
└── final/             approved pieces only
Then put your voice in CLAUDE.md. A starting point:
# How to write for me

## Voice
- Plain English. Short sentences, mixed with the odd longer one.
- Use contractions (it's, don't, you'll).
- No em dashes. Use commas, full stops or brackets.
- Never use: delve, leverage, utilize, robust, seamless, unlock, game-changer.

## Process
- Outline first. Wait for my approval before drafting.
- Draft one section at a time unless I say otherwise.
- Never overwrite a file in /drafts. Save a new version (-v2, -v3).

## Facts
- Never invent a statistic, quote, name or example.
- Every fact needs a source I can open. If you can't find one, say so.
Project 2 · From brief to draft, with you in control
/plan
Read brief.md and everything in /research. Propose an outline for a
[1,500]-word article for [small business owners] about [topic]. For each
section, note which research file supports it. Don't write anything yet.
When you've approved the outline:
Draft the introduction and the first section only, in /drafts/article-v1.md.
Follow my CLAUDE.md voice rules. Then stop and wait.
Project 3 · The consistency check (long work)
Read every chapter in /drafts. Build a table of every character name,
place, date and repeated term, and flag anywhere they're spelled or used
differently. Don't fix anything. Just give me the list.
This is where a folder beats a chat window. A chat forgets chapter 2 by chapter 9. Claude Code re-reads the files.
Project 4 · The fact-check pass
List every factual claim in /drafts/article-v3.md: numbers, dates, names,
"studies show" lines. For each one, search the web for a primary source,
open it, and tell me: confirmed, contradicted, or unconfirmed, with the
link. Be adversarial. Assume the draft contains mistakes.
Project 5 · One piece, five formats
Take /final/article.md and make, in /repurposed:
1. a newsletter version (400 words)
2. five LinkedIn posts, each one idea, each under 1,200 characters
3. a 60-second video script with on-screen text notes
Keep my voice rules. Never add a fact that isn't in the original.
Save it as a skill
Save the fact-check pass as a skill called fact-check. It takes a file
name and returns the confirmed / contradicted / unconfirmed table.
Watch-outs for writers
- ⚠️ Your voice drifts if you let it. Read every draft aloud before it goes out.
- ⚠️ Made-up facts are the big risk. The
CLAUDE.mdrule above plus the fact-check skill is your safety net. Use both. - ⚠️ Client confidentiality. Files in the folder are sent to the AI model while it works. Check your client contracts before you drop their material in.
- ⚠️ Keep versions. Git (Part 3) gives you a full history of every draft for free.
Business owners
The short version: you don't need to code to get value. You need a folder of your own messy business files and a list of the jobs you hate doing. Claude Code turns exports into reports, notes into documents, and repeated chores into one-word commands.
What it's good at for you
| Job | What you'd type |
|---|---|
| Reports from exports | "Turn this sales export into a one-page monthly summary with charts" |
| Clean up spreadsheets | "Fix the dates, remove duplicates, add a totals tab" |
| SOPs | "Turn my voice-note transcript into a step-by-step SOP for new staff" |
| Proposals and quotes | "Fill this proposal template for [client] from my call notes" |
| Research | "Compare the pricing pages of these five competitors in a table" |
| A simple web page | "Build a one-page landing page for our new service, and show me it" |
| Recurring chores | Save any of the above as a skill, or schedule it |
Install first
- ✅ Nothing, to start.
- ⚪ Python (Part 4) once you start doing charts and spreadsheets. Claude will tell you when it needs it.
Project 1 · The monthly report you keep putting off
Export your sales, bookings or invoices to a CSV or Excel file. Put it in a folder.
/plan
Read sales-september.csv. Build a one-page summary for me as a business
owner: total revenue, number of orders, average order value, best and
worst five products, and how it compares with August (august.csv). Add
two simple charts. Save it as a PDF in /reports. Show me your numbers
before you make the PDF, and tell me exactly how you calculated each one.
"Tell me how you calculated each one" is the business owner's superpower. It turns "trust me" into "here's the working", so you can catch a mistake in 30 seconds.
Project 2 · Turn a voice note into an SOP
Record yourself explaining a process on your phone, get a transcript (most phones and meeting tools make one), and save it in the folder.
Read onboarding-transcript.txt. Turn it into a clear step-by-step SOP for
a new staff member: numbered steps, who does what, what "done" looks like,
and the common mistakes I mentioned. Save it as a Word document.
Project 3 · Proposals in minutes, not hours
/plan
Use proposal-template.docx as the layout. Read call-notes-[client].md and
fill in a proposal for [client]. Keep my pricing exactly as written in
pricing.md. Never invent a deliverable I didn't mention. Mark anything
you're unsure about in yellow so I can check it.
Project 4 · A landing page you can see before anyone else does
/plan
Build a simple one-page website for [our new service]. Sections: headline,
three benefits, how it works, prices from pricing.md, and a contact button.
Make it look clean on a phone. Open it in my browser so I can see it.
Don't publish anything anywhere.
Project 5 · Competitor research, with links
Visit the websites of these competitors: [list]. For each one, find their
prices, their main promise and their guarantee. Put it in a table with a
link to the exact page for each fact. If you can't find something, write
"not shown" rather than guessing.
Connect your business apps
The Claude desktop app has connectors (one-click links to apps like Gmail, Google Drive, Slack and Notion). Part 7 shows how. Start with read-only jobs: "Summarise my unread emails from clients", never "reply to everyone".
Save it as a skill, or schedule it
Save the monthly report as a skill called monthly-report. Next month I'll
drop in the new export and type /monthly-report.
Watch-outs for business owners
- ⚠️ Customer data. Files you put in the folder are read by the AI. Remove information you don't need (card numbers, ID numbers, health details) before you start.
- ⚠️ Never let it send, publish or pay. Write "never send, publish, delete or pay
for anything without asking me" in your
CLAUDE.md. - ⚠️ Check the numbers. Spot-check any total against your own system before you share a report. Always.
- ⚠️ Mind the meter. Start on the cheaper plan and watch your usage for a week (Part 8) before upgrading.
Media buyers (Meta and Google Ads)
The short version: you live in exports, spreadsheets, naming conventions and copy variations. That's exactly Claude Code's home ground. It reads the CSV, does the maths, writes the variations to the character limit, and builds the client report, while you make the actual decisions.
What it's good at for you
| Job | What you'd type |
|---|---|
| Account analysis | "Find my winning and losing ad sets in this export, by cost per result" |
| Search terms mining | "Turn this search terms report into a negative keyword list" |
| Copy at the limit | "Write 15 RSA headlines under 30 characters, and prove the count" |
| Naming and UTMs | "Check every campaign name against our convention and list the breaks" |
| Client reports | "Build the weekly report from these two exports, same layout as last week" |
| Creative variations | "Make 6 static ad concepts from this brief, in 1:1 and 9:16" |
| Pacing | "We've spent X of Y with 9 days left. What daily budget lands us on target?" |
Install first
- ✅ Python (Part 4). Every analysis runs on it.
- ⚪ An ImageRouter key (Part 5) if you want to generate creative.
- ⚪ A connection to your ad accounts (below), only after you're comfortable with exports.
Start with exports, not live accounts
Export the report from Ads Manager or Google Ads as a CSV. Put it in a folder. Work on the file. Nothing you do can touch a live campaign, which is exactly how you want to learn.
Project 1 · Winners and losers in one pass
/plan
Read meta-export-last-30-days.csv. I care about [cost per purchase]
with a target of [₹800 / $25]. Give me:
1. ad sets above and below target, sorted by spend
2. ads with frequency above 3 and a rising cost, a sign of fatigue
3. where 80% of the spend went
Show your working for every number, and flag any rows with too little
data to judge (fewer than results). Don't recommend budget changes
yet. Just the diagnosis.
"Flag rows with too little data" stops it declaring a winner off three conversions. The AI won't think about statistical noise unless you tell it to.
Project 2 · Negative keywords from a search terms report
Read search-terms.csv from Google Ads. Group the search terms by theme.
Flag terms with spend but no conversions, and terms that clearly don't
match what we sell ([what you sell]). Give me a suggested negative
keyword list with match types, plus a list of converting terms we
should add as keywords. Don't change anything in the account.
Project 3 · Responsive search ad copy, checked by a script
Google's limits for responsive search ads are 30 characters per headline, 90 per description, and 15 per path field, with up to 15 headlines and 4 descriptions per ad (Google Ads Help, linked in Sources). Make Claude prove it hit them:
Write 15 headlines and 4 descriptions for a responsive search ad for
[product]. Then write a tiny script that counts the characters in each
one, and show me the table. Rewrite anything over the limit. Headlines
max 30, descriptions max 90.
This is the trick that changes everything. Models are bad at counting letters. Code is perfect at it. When a number matters, make Claude check it with a script instead of estimating it.
For Meta, check the current recommended text lengths for your placement in Meta's Ads Guide, then give Claude those numbers the same way.
Project 4 · Naming conventions and UTMs
Our naming convention is: [Country]_[Objective]_[Audience]_[Date].
Read campaigns.csv and list every campaign, ad set and ad name that breaks
it. Then build a UTM link for each ad from this pattern:
utm_source=[facebook]&utm_medium=[paid_social]&utm_campaign={campaign}&utm_content={ad}
Save it as a spreadsheet.
Project 5 · The weekly client report
/plan
Build this week's client report from meta-week.csv and google-week.csv:
spend, results, cost per result and return on ad spend per platform,
versus last week (in /last-week). Add one chart per platform and three
plain-English bullet points on what changed and why. Save as PDF. Show me
every number before you make the PDF.
Once it looks right, save it as a skill (/weekly-report) and it becomes a
five-minute job.
Connecting live ad accounts (later, and carefully)
Both platforms now have official MCP servers (connectors that give Claude tools for your ad account). Part 7 explains MCP. Checked 1 October 2026:
| Meta ads MCP server | Google Ads MCP server | |
|---|---|---|
| Made by | Meta, hosted at https://mcp.facebook.com/ads (open beta since 29 April 2026) |
Google, open source at github.com/googleads/google-ads-mcp |
| Can it change campaigns? | ⚠️ Yes. Meta's docs list "Create and edit ads, ad sets, and campaigns" alongside reporting | No. Its tools search and read account data only |
| Setup | Meta says no developer credentials or coding are needed | Needs a Google Cloud project, OAuth credentials, and a developer token with at least Explorer access for real accounts. Ask Claude to walk you through it |
| Add it to Claude Code | claude mcp add --transport http meta-ads https://mcp.facebook.com/ads, then /mcp to sign in |
Ask Claude to add it with claude mcp add. (Its README suggests a settings file instead; claude mcp add is the method Claude Code's own docs use) |
Because Meta's connector can spend money, the rules below aren't optional. Add a permission rule too, so Claude has to ask before using any Meta tool that writes: "Set up my Claude Code permissions so every Meta ads tool that creates, edits, pauses or changes budgets needs my approval each time."
Rules for live accounts:
- Read-only first. Use it for reporting for at least two weeks before anything else.
- Every change needs your "yes". Put this in
CLAUDE.md: "Never create, edit, pause or change the budget of any campaign, ad set or ad without my explicit confirmation in this conversation." - Read it back. After any approved change, ask Claude to read the setting back from the platform and show you it's what you asked for.
- Never let it raise a budget on its own. Ever.
Creative variations
With the ImageRouter key from Part 5:
/plan
Read creative-brief.md. Propose 6 static ad concepts, each with a one-line
hook. Wait for me to pick 3. Then generate each one at 1080x1080 and
1080x1920 with ImageRouter. Put the hook text in the image exactly as
written, and check every word in the result before showing me.
Watch-outs for media buyers
- ⚠️ Platform numbers disagree with each other. Meta, Google and your analytics will never match exactly. Tell Claude which source is the truth for each metric.
- ⚠️ Never fabricate a number. Add "never estimate a metric; if it's not in the
file, say so" to your
CLAUDE.md. - ⚠️ Client data stays private. Exports contain account details. Use a separate folder per client.
- ⚠️ Policy. Generated ad creative still has to pass each platform's ad policies. Claude doesn't know the latest rejection reasons for your niche. You do.
Developers
The short version: you'll get productive in ten minutes. This chapter is the dense version: the configuration that turns Claude Code from a chat in a terminal into your team's development environment. Everything here is in Anthropic's docs, linked in Sources.
The mental model
Claude Code runs a loop: gather context (read files, run commands), act (edit,
execute), verify (run the tests, check output), repeat. You can interrupt any time
with Esc. Your job is to make each turn of that loop cheaper and safer, with four
levers: CLAUDE.md, permissions, skills and hooks.
Models and effort (checked 1 Oct 2026)
| Alias | Resolves to (Anthropic API) | Use it for |
|---|---|---|
opus |
Opus 5.5 (the default on Pro, Max, Team, Enterprise and API) | Most work |
sonnet |
Sonnet 5.5 | Fast everyday edits |
haiku |
the fast Haiku model | Trivial, high-volume tasks |
fable |
Fable 5.1, the most capable tier | Long, hard, multi-session work. On some plans it bills to usage credits |
opusplan |
Opus while planning, Sonnet while executing | Big plans, cheap execution |
opus[1m] |
Opus with a 1M-token context window | Large codebases |
/effort sets reasoning depth: low, medium, high, xhigh, max (Opus 5.5 starts
at medium). Put ultrathink anywhere in a prompt for deeper reasoning on that one
turn. "Think hard" and "think more" are no longer keywords, just ordinary text.
Permission modes
Shift + Tab cycles Manual (default) → acceptEdits → plan, and auto when
available. Set one at launch with --permission-mode.
| Mode | Runs without asking |
|---|---|
default (shown as Manual) |
reads only |
acceptEdits |
reads, file edits, and mkdir / touch / mv / cp in the working dirs |
plan |
reads and read-only commands; proposes before editing |
auto |
everything, with a background classifier checking each action against your request |
dontAsk |
auto-denies anything not pre-allowed (for locked-down CI) |
bypassPermissions |
everything. Anthropic: "Only use this mode in isolated environments like containers or VMs" |
Permission rules: settings.json
{
  "$schema": "https://json.schemastore.org/claude-code-settings.json",
  "permissions": {
    "allow": [
      "Bash(npm run lint)",
      "Bash(npm run test *)",
      "Bash(git status)",
      "Bash(git diff *)"
    ],
    "ask": [
      "Bash(git push *)"
    ],
    "deny": [
      "Read(./.env)",
      "Read(./.env.*)",
      "Bash(rm -rf *)"
    ]
  }
}
- Order: deny, then ask, then allow. The first match wins, and an allow can't carve an exception out of a deny.
- The space matters:
Bash(ls *)doesn't matchlsof;Bash(ls*)does. The olderBash(ls:*)form still works at the end of a pattern. - Files, highest priority first: managed policy → command-line flags →
.claude/settings.local.json(yours, git-ignored) →.claude/settings.json(commit it, shared with the team) →~/.claude/settings.json(all your projects). - Strict JSON: a comment or trailing comma is a syntax error. Run
/statusto confirm the file loaded.
CLAUDE.md, properly
- Loads from
~/.claude/CLAUDE.md,./CLAUDE.mdor./.claude/CLAUDE.md, a privateCLAUDE.local.md(git-ignore it) and.claude/rules/*.md. Files from the working directory and every parent directory are concatenated. - Import other files with
@path/to/file(up to four hops deep). - No
CLAUDE.md? It falls back toAGENTS.md. - Auto memory is on by default: Claude keeps its own notes in
~/.claude/projects/<project>/memory/. Manage it with/memory. - Put a
CLAUDE.mdin risky folders (auth, billing) with the constraints for that folder. Claude reads it when it works there.
Skills (custom commands merged into them)
A skill is a folder with a SKILL.md. .claude/skills/<name>/SKILL.md (project) or
~/.claude/skills/<name>/SKILL.md (personal) becomes /<name>. The older
.claude/commands/<name>.md still works.
---
name: pr-summary
description: Summarize changes in a pull request
context: fork
agent: Explore
allowed-tools: Bash(gh *)
---

## Pull request context
- PR diff: !`gh pr diff`
- PR comments: !`gh pr view --comments`
- Changed files: !`gh pr diff --name-only`

Summarise the PR in three bullets, then list open action items.
!`command`at the start of a line runs before Claude sees the skill, and the output replaces it.$ARGUMENTS,$0,$1take arguments:/fix-issue 123.disable-model-invocation: true= only you can run it (use it for/deploy).user-invocable: false= only Claude can.context: forkruns it as a fresh subagent that does not see your conversation. The name is misleading.- Only
descriptionis recommended; every field is optional.
Hooks: rules that can't be ignored
CLAUDE.md is a request. A hook is enforced. Hooks live in any settings.json and fire
on 30+ events (SessionStart, UserPromptSubmit, PreToolUse, PostToolUse, Stop,
PreCompact, SessionEnd and more). Five handler types: command, http, mcp_tool,
prompt and agent.
The official starter, a desktop notification when Claude needs you (macOS):
{
  "hooks": {
    "Notification": [
      {
        "matcher": "",
        "hooks": [
          {
            "type": "command",
            "command": "osascript -e 'display notification \"Claude Code needs your attention\" with title \"Claude Code\"'"
          }
        ]
      }
    ]
  }
}
Auto-format after every edit:
"PostToolUse": [
  {
    "matcher": "Edit|Write",
    "hooks": [{ "type": "command", "command": "jq -r '.tool_input.file_path' | xargs npx prettier --write" }]
  }
]
To block an action from a PreToolUse hook, either exit with code 2 (stderr becomes
the reason, and nothing can override it), or exit 0 and print:
{
  "hookSpecificOutput": {
    "hookEventName": "PreToolUse",
    "permissionDecision": "deny",
    "permissionDecisionReason": "Destructive command blocked by hook"
  }
}
Subagents
A subagent is a specialist with its own context window, tools and model. Define one in
.claude/agents/<name>.md (project) or ~/.claude/agents/<name>.md (personal):
---
name: code-reviewer
description: Reviews code for quality and best practices
tools: Read, Glob, Grep
model: sonnet
---

You are a code reviewer. When invoked, analyze the code and provide
specific, actionable feedback on quality, security, and best practices.
- Claude delegates automatically based on
description, or you call it:@"code-reviewer (agent)" look at the auth changes. isolation: worktreegives it a temporary git worktree, cleaned up if nothing changed.- Built in: Explore (read-only search), Plan (research during plan mode) and general-purpose.
/agentsno longer opens a wizard. Ask Claude to create the agent, or write the file.- ⚠️ Every subagent spends your allowance. Unchecked fan-out is the fastest way to burn a weekly limit (Part 8).
MCP servers
# Remote server (recommended)
claude mcp add --transport http notion https://mcp.notion.com/mcp

# With a header
claude mcp add --transport http secure-api https://api.example.com/mcp \
  --header "Authorization: Bearer your-token"

# Local process: everything after -- is the server command
claude mcp add --env AIRTABLE_API_KEY=YOUR_KEY --transport stdio airtable \
  -- npx -y airtable-mcp-server

# Share with the team (writes .mcp.json, commit it)
claude mcp add --scope project --transport http notion https://mcp.notion.com/mcp
| Scope | Where it's stored | Who gets it |
|---|---|---|
local (default) |
~/.claude.json, under this project |
you, this project |
project |
.mcp.json in the repo |
everyone who clones it |
user |
~/.claude.json |
you, every project |
.mcp.json expands ${VAR} and ${VAR:-default}, so tokens stay in the environment,
not the repo. The SSE transport is deprecated; use http. Run /mcp to authenticate
(OAuth) and toggle servers, and claude mcp list from the shell.
Running in parallel
claude -w feature-auth        # isolated worktree at .claude/worktrees/feature-auth
claude -w bugfix-logging      # second terminal, no file conflicts
claude -n "auth-refactor"     # name a session; resume with: claude --resume auth-refactor
Worktrees are fresh checkouts, so git-ignored files like .env aren't there. List them
in a .worktreeinclude file at the repo root to have them copied in.
/batch <instruction> splits a large change into 5 to 30 units, each handled by a
background subagent in its own worktree.
Headless and scripting
claude -p "explain this function"                       # print and exit
cat build-error.txt | claude -p 'concisely explain the root cause of this build error' > output.txt
claude -p "query" --output-format json                  # machine-readable
claude -c -p "Check for type errors"                    # continue the last session
claude -p --max-turns 3 "query"                         # cap the agent loop
claude --bare -p "query"                                # skip hooks, skills, plugins, MCP, CLAUDE.md
Anthropic calls --bare the "recommended mode for scripted and SDK calls".
Undo, honestly
/rewind (or Esc twice on an empty prompt) restores code, conversation or both. It does
not undo what shell commands did (rm, mv, cp), most subagent edits, or changes
made outside Claude Code. Anthropic's own heading: "Not a replacement for version
control." Commit before anything big.
GitHub
Run /install-github-app inside Claude Code (github.com only). It installs the app, stores
the secret and opens a PR with a workflow using anthropics/claude-code-action@v1. Then
comment @claude implement this feature based on the issue description on any issue or PR.
/code-review (alias /review) reviews your branch; /security-review checks the diff
for vulnerabilities.
Plugins
A plugin bundles skills, agents, hooks and MCP servers into one install. /plugin opens
the browser (Discover, Installed, Marketplaces). The official marketplace
(claude-plugins-official) is added on first start. Anthropic's public skills:
/plugin marketplace add anthropics/skills
/plugin install document-skills@anthropic-agent-skills
That gives Claude Word, PowerPoint, Excel and PDF skills (source-available, not open source). Note the docs' warning: an enabled plugin's descriptions sit in context every turn, so unused plugins still cost tokens.
Beyond the terminal: the Agent SDK vs Managed Agents
Two different products, often confused (the earlier version of this guide confused them):
| Claude Agent SDK | Claude Managed Agents | |
|---|---|---|
| What | A library that runs the Claude Code engine inside your own program | A hosted agent harness in an Anthropic-managed (or self-hosted) sandbox |
| Install | pip install claude-agent-sdk / npm install @anthropic-ai/claude-agent-sdk |
pip install anthropic (beta API) |
| Entry point | query() |
client.beta.agents.create(...), then environments and sessions |
| Choose it when | You want Claude Code's loop and tools in your own app or pipeline | You want Anthropic to run the sandbox and long-running sessions |
The official Agent SDK quickstart (Python 3.10+, ANTHROPIC_API_KEY set; the SDK
doesn't read .env files itself):
import asyncio
from claude_agent_sdk import query, ClaudeAgentOptions, AssistantMessage, ResultMessage

async def main():
    # Agentic loop: streams messages as Claude works
    async for message in query(
        prompt="Review utils.py for bugs that would cause crashes. Fix any issues you find.",
        options=ClaudeAgentOptions(
            allowed_tools=["Read", "Edit", "Glob"],  # Auto-approve these tools
            permission_mode="acceptEdits",  # Auto-approve file edits
        ),
    ):
        # Print human-readable output
        if isinstance(message, AssistantMessage):
            for block in message.content:
                if hasattr(block, "text"):
                    print(block.text)  # Claude's reasoning
                elif hasattr(block, "name"):
                    print(f"Tool: {block.name}")  # Tool being called
        elif isinstance(message, ResultMessage):
            print(f"Done: {message.subtype}")  # Final result

asyncio.run(main())
The developer starter repo
The companion repository from the earlier edition of this guide, Win-Massive-Impact/claude-code-commands, has slash commands, skill templates, hook scripts and MCP configs to copy from. Check any snippet against the current docs before you rely on it; the tables above reflect Claude Code as of 1 October 2026.
Production checklist
-
CLAUDE.mdwith architecture, conventions, commands and dangerous patterns -
.claude/settings.jsoncommitted with allow / ask / deny rules -
Read(./.env)andRead(./.env.*)denied - Your three most repeated workflows saved as skills
- A
PostToolUsehook for formatting or tests, aPreToolUsehook for anything that must never run - MCP servers for the tools you copy-paste from most, scoped
projectwhere the team needs them - One custom subagent for a recurring class of work (review, tests)
-
.worktreeincludeif you work in parallel worktrees - Commits before big changes;
/rewindtreated as a convenience, not a backup
Watch-outs for developers
- ⚠️ Review the diff. The most upvoted thread in r/ClaudeCode in September 2026 (1,915 votes) was a senior engineer describing a team where "No more human code reviews" had become the norm. The top practical reply (107 votes): "No more human code reviews is a dangerous precedent that my company hasn't been ready to cross yet."
- ⚠️
bypassPermissionsbelongs in a container. Not on your laptop. - ⚠️ MCP servers that fetch the web can carry prompt injection. Anthropic's MCP page: "Verify you trust each server before connecting it."
- ⚠️ Skills and plugins run with Claude Code's permissions. Read one before you install it.
Part 7 · Power-ups for everyone
You don't need any of these on day one. Come back when a job starts to feel repetitive.
Skills: save a workflow, rerun it with one word
A skill is a saved set of instructions. Once something works, say:
Save what we just did as a skill called [name], so next time I can type
/[name] and you'll do it the same way.
Claude writes a small SKILL.md file in .claude/skills/[name]/ (for this folder) or in
~/.claude/skills/[name]/ (for every folder on your computer, if you ask for that). Next
time, type /[name]. Type /skills to see them all.
Don't start from scratch. Ready-made skills, star counts checked on 1 October 2026:
| Where | Stars | What you get |
|---|---|---|
| anthropics/skills | 179,212★ | Anthropic's own: Word, PowerPoint, Excel and PDF skills, brand guidelines, design and more |
| obra/superpowers | 293,534★ | A working method: brainstorm, plan, test, review |
| hesreallyhim/awesome-claude-code | 54,868★ | A curated list of the best community resources |
To add Anthropic's document skills (Word, PowerPoint, Excel, PDF), type these two lines inside Claude Code:
/plugin marketplace add anthropics/skills
/plugin install document-skills@anthropic-agent-skills
⚠️ A skill runs with Claude Code's permissions in your folder. Read one (or ask Claude to explain it) before you install it.
Connectors (MCP): plug Claude into your other apps
MCP (Model Context Protocol) is a standard plug that connects Claude to other apps: Gmail, Google Drive, Notion, Slack, Figma, Canva, Meta Ads, Google Ads and many more.
Two ways to add one:
- The easy way: add connectors on the web at claude.ai/customize/connectors.
They then show up in Claude Code too (type
/mcpto see them). On Team and Enterprise plans, only admins can add them. - The direct way: paste the line the app gives you, for example Figma's:
claude mcp add --transport http figma https://mcp.figma.com/mcp
Then type /mcp inside Claude Code and follow the sign-in.
Rules for connectors:
- Start read-only: summarise, report, find. Not send, post, edit or spend.
- Anthropic's own advice: "Verify you trust each server before connecting it. Servers that fetch external content can expose you to prompt injection risk." (Prompt injection means hidden instructions inside a web page or email trying to steer the AI.)
- Connect only what this job needs.
Hooks: rules it can't ignore
CLAUDE.md rules are requests. A hook is an automatic rule that always runs at a
set moment, like "after every file edit" or "before any command". Use them for things
that must never go wrong. You don't need to write one yourself:
Make me a hook that shows a Mac notification whenever you need my
attention, so I can work on something else while you run.
Developers: the full hook system is in the developer chapter.
Running things on a schedule
| Option | Runs on | Computer must be on? | Good for |
|---|---|---|---|
/loop 10m [task] |
your computer | yes, with Claude Code open | Checking something every few minutes while you work |
| Desktop app scheduled tasks | your computer | yes | Daily jobs on your own files |
/schedule [task] (cloud routines) |
Anthropic's cloud | no | Weekly reports, monitoring. Works on a fresh copy, not your local files |
Use it from your phone
- Remote Control: type
/remote-controlin a session, then carry on from claude.ai/code or the Claude app on iOS or Android. The work still runs on your computer. - Cloud sessions: start a task at claude.ai/code from your phone, and it keeps running after you close the app.
Bring a terminal session into the desktop app
Type /desktop and your current session moves into the Claude desktop app (Mac and
Windows x64).
Part 8 · Usage limits, and how to make them last
How the allowance works
Your plan's allowance is shared between Claude chat and Claude Code. It resets on a rolling five-hour window, and paid plans have a weekly limit on top. When you hit it, Claude Code stops and waits for the reset. It doesn't surprise you with a bill.
Type /usage any time to see where you are.
The controversy you should know about
In September 2026, threads on Reddit with hundreds of votes (585 and 483) described paying customers running out far faster than before. A post on r/ClaudeCode (38 votes): "Couldn't even work for 2 hours on 5x. Max 5 feels like the Pro plan unfortunately." Others in the same threads said they used it all day without hitting a limit.
The two replies worth remembering:
"What models are you using? I have no issues."
"Are you letting Claude run wild and start popping agents? If you let it, it can use your whole quota in 30 minutes."
Six habits that stretch your allowance
| Habit | How |
|---|---|
| 1 · Match effort to the job | /effort low for simple chores. Save high and max for hard problems |
| 2 · Use the right model | /model sonnet or /model haiku for routine work. Opus for thinking |
| 3 · Start fresh between jobs | /clear when you switch tasks. A long conversation costs more every turn |
| 4 · Compact long sessions | /compact summarises the conversation so far and frees room. /context shows how full it is |
| 5 · Watch the helpers | If it starts many sub-agents at once, ask why. Say "do this yourself, no sub-agents" for small jobs |
| 6 · Plan first | A five-minute plan stops an hour of wrong work. Wrong work is the most expensive kind |
Part 9 · Ten safety rules
Print this. Stick it next to your screen.
- One folder per job. Never open Claude Code in your whole home folder or Desktop.
- Plan mode for anything real.
/planfirst, approve second. - Git before big changes. "Save a snapshot first."
- Never overwrite originals. New folder, new version, every time.
- If you don't understand a prompt, say No and ask what it would have done.
- Keys live in
.env. Never in the chat, never in a document, never on screen. - A spending limit on every API key.
- Nothing goes out without you. No sending, posting, publishing, paying or campaign
changes without your explicit yes. Write it in
CLAUDE.md. - Private data stays out, unless you need it. Remove card numbers, ID numbers and health details from files before you start.
- Check the result yourself. Claude Code is fast, not infallible. You're the one who signs it off.
A starter rule set for your CLAUDE.md covering most of these is in Part 3.
Part 10 · When something goes wrong
Find your problem. Do the fix. If it's still stuck, copy the exact error message and paste it to Claude: "I got this error. Explain it simply and fix it." That alone solves most problems.
| # | What you see | What it means | The fix |
|---|---|---|---|
| 1 | command not found: claude (Mac) or 'claude' is not recognized (Windows) |
The terminal hasn't noticed the new program yet | Close the terminal window completely, open a new one, try again. Still failing? Follow "If it says command not found" in Part 2, Step 4 |
| 2 | The token '&&' is not a valid statement separator |
You're in PowerShell, using a Command Prompt line | Use the PowerShell install line from Part 2 |
| 3 | 'irm' is not recognized |
You're in Command Prompt | Close it. Open PowerShell |
| 4 | "The free claude.ai plan does not include Claude Code access" | You're on the free plan | Upgrade to Pro at claude.com/pricing |
| 5 | python / node / ffmpeg not found after Part 4 |
Same as problem 1 | Close and reopen the terminal. Then claude --continue |
| 6 | Typing your Mac password shows nothing | That's normal | Type it anyway, press Enter |
| 7 | ModuleNotFoundError: No module named ... |
A library isn't in your toolbox yet | "Install the missing library into my claude-toolbox with uv and try again" |
| 8 | 401 or Unauthorized from a script |
The API key is wrong, missing or revoked | Check .env: right name, no spaces, no quotes. Make a fresh key if needed |
| 9 | 402 or insufficient credits |
No credit left on that service | Top up, and check the key's credit limit |
| 10 | Claude stopped and says you've hit your limit | Your five-hour or weekly allowance is used up | Wait for the reset (/usage shows when). Then read Part 8 |
| 11 | It's going in the wrong direction | You're allowed to stop it | Press Esc, then tell it what you want instead |
| 12 | It changed something you didn't want | Undo | /rewind (or Esc twice), or "go back to the last git snapshot" |
| 13 | Something's odd and you can't tell what | Claude Code has a self-check | Type /doctor, or run claude doctor in the terminal |
The cheat sheet
Everything you'll type most, on one page. Print it. Every command and shortcut below was checked against Claude Code 2.1.286's own help screens on 1 October 2026.
1 · Terminal basics (before you start Claude)
| What you want | Mac | Windows (PowerShell) |
|---|---|---|
| Where am I? | pwd |
pwd |
| What's in this folder? | ls |
ls |
Show hidden files too (like .env) |
ls -a |
ls -Force |
| Go into a folder | cd Documents |
cd Documents |
| Go into a folder with spaces in its name | cd "My Projects" |
cd "My Projects" |
| Go back up one folder | cd .. |
cd .. |
| Go up two folders | cd ../.. |
cd ..\.. |
| Go to your home folder | cd ~ |
cd ~ |
| Make a new folder | mkdir my-project |
mkdir my-project |
| Make a folder and go straight into it | mkdir my-project && cd my-project |
mkdir my-project; cd my-project |
| Open this folder in Finder / File Explorer | open . |
explorer . |
| Open a file in its normal app | open report.pdf |
start report.pdf |
| Clear the screen | clear |
clear (or cls) |
| Stop whatever is running | Ctrl + C |
Ctrl + C |
| Repeat or edit an earlier command | ↑ arrow |
↑ arrow |
| Finish a long file or folder name for you | type the first letters, press Tab |
same |
| Close the terminal | exit |
exit |
Two tricks worth knowing:
- Drag and drop: type
cd(with a space), drag a folder from Finder or File Explorer into the window, press Enter. ..means "the folder above"..means "this folder".~means "my home folder".
2 · Starting Claude Code
| Type this in the terminal | What it does |
|---|---|
claude |
Start a new session in this folder |
claude "summarise the notes in /notes" |
Start and give it a first job straight away |
claude --continue (or claude -c) |
Carry on your last conversation in this folder |
claude --resume (or claude -r) |
Pick from a list of earlier conversations |
claude --resume monthly-report |
Reopen a conversation you named |
claude -n monthly-report |
Start a session and give it a name, so you can find it later |
claude --model sonnet |
Start with a particular model (opus, sonnet, haiku, fable) |
claude --permission-mode plan |
Start in plan mode, so it plans before doing anything |
claude --verbose |
Show more detail about what it's doing behind the scenes |
claude --verbose --continue |
Carry on where you left off, with full detail |
claude -p "what's in this folder?" |
Ask one question, print the answer, and exit |
claude --version (or claude -v) |
Show the installed version |
claude update |
Check for an update and install it |
claude doctor |
Health check, when something's wrong |
claude --safe-mode |
Start with all your add-ons switched off (for troubleshooting) |
claude mcp list |
List your connectors |
Mix and match. Options combine. claude -c --model sonnet carries on your last
conversation using Sonnet.
3 · Inside Claude Code: slash commands
Type these in the Claude Code box, not the terminal.
| Command | What it does |
|---|---|
/help |
Everything it can do |
/plan |
Plan first, change nothing until you approve |
/init |
Write a CLAUDE.md for this folder |
/memory |
Edit your CLAUDE.md rules and what it remembers |
/model |
Switch model (/model sonnet, /model opus) |
/effort |
How hard it thinks: low medium high xhigh max |
/clear |
Fresh conversation (do this between unrelated jobs) |
/compact |
Shrink a long conversation to free up room |
/context |
How full its working memory is |
/resume |
Jump back to an earlier conversation |
/rename |
Rename this conversation |
/rewind |
Undo back to an earlier point |
/permissions |
What it may do without asking |
/skills |
Your saved skills |
/mcp |
Your connectors, and sign-in |
/usage |
How much of your plan you've used |
/status |
Version, model, account |
/theme |
Change the colours |
/doctor |
Check-up that can fix problems |
/exit (or /quit) |
Leave Claude Code |
4 · Inside Claude Code: keyboard shortcuts
From Claude Code's own shortcut screen (type ? to see it) and Anthropic's interactive-mode page:
| Press | What happens |
|---|---|
Enter |
Send your message |
\ then Enter |
New line without sending |
Esc |
Stop what it's doing right now. It keeps the work done so far. On a permission prompt, Esc means No |
Esc Esc (on an empty box) |
Open the rewind menu, to undo |
Esc Esc (with text typed) |
Clear what you've typed |
Shift + Tab |
Switch mode: Manual → accept edits → plan (on some Windows setups, Alt + M) |
↑ |
Bring back an earlier message |
! |
Shell mode: run a terminal command yourself, like ! ls |
@ |
Point at a file: @notes/brief.md summarise this |
/ |
Show commands |
? |
Show all shortcuts |
Ctrl + O |
Show more detail (verbose output) |
Ctrl + T |
Show or hide the task list |
Ctrl + V (Windows: Alt + V) |
Paste an image (screenshot, photo) for it to look at |
Ctrl + S |
Stash what you've typed, to come back to it |
Ctrl + G |
Write a long message in your text editor |
Ctrl + C |
Cancel. With nothing running, press twice to quit |
Ctrl + R |
Search everything you've typed before |
Option + P (Windows: Alt + P) |
Switch model without losing what you've typed |
Ctrl + B |
Send a long-running command to the background, so you can keep chatting |
Ctrl + L |
Redraw the screen if it looks garbled |
/btw |
Ask a quick side question without derailing the main job |
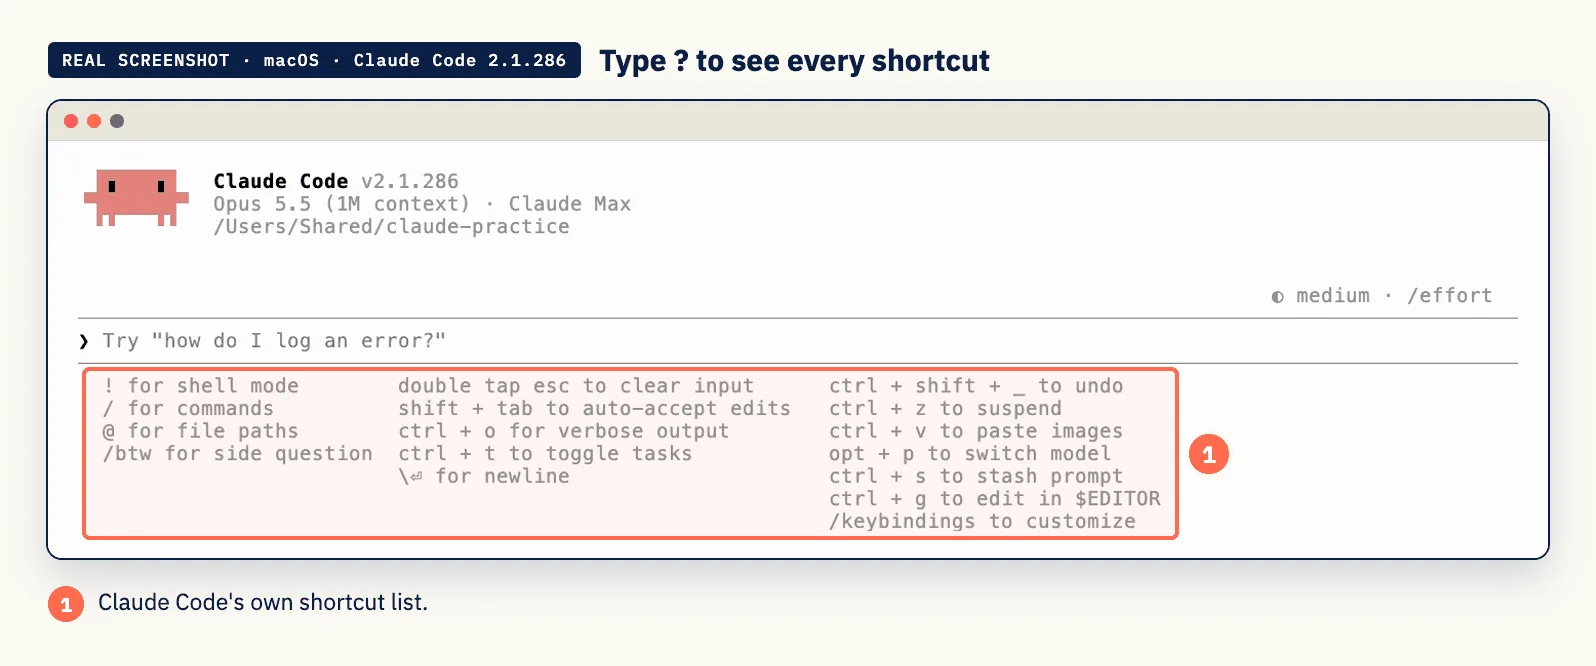
5 · The five lines you'll use every day
cd ~/my-project              go to your project
claude -c                    carry on where you left off
/plan                        plan the next job
/clear                       fresh start between jobs
/exit                        done for the day
Mistakes to avoid
❌ 1 · Thinking it's only for coders
It's for anything that lives in a folder. Most of this guide has nothing to do with code.
❌ 2 · Opening it in your whole computer
One folder per job. Always.
❌ 3 · Skipping plan mode
It'll start working straight away otherwise, and you'll spend longer undoing than planning.
❌ 4 · Pasting API keys into the chat
Keys go in .env, typed by you. Part 5.
❌ 5 · An empty CLAUDE.md
It's where your rules live. Without it you repeat yourself every session.
❌ 6 · Maximum effort on everything
It drains your allowance for no gain on simple jobs.
❌ 7 · Letting it act on live accounts too early
Ad accounts, inboxes, websites: read-only first, for weeks.
❌ 8 · Trusting a number you didn't check
Ask it to show its working. Spot-check against the source.
❌ 9 · No git
/rewind isn't a full undo. Git is.
❌ 10 · Trusting viral tip lists
Popular "pro tips" posts include claims that aren't in the documentation. If a trick matters, check it against Anthropic's docs (linked in Sources).
Best practices
✅ /init in every new folder, then add your rules to CLAUDE.md
✅ "Verify, don't trust" as the first rule in every CLAUDE.md
✅ Plan mode for anything beyond a one-liner
✅ A git snapshot before big changes
✅ Originals never touched; new files in new folders
✅ Every repeated job saved as a skill
✅ Effort and model matched to the job
✅ A human signs off on anything that leaves the building
Your first week
| Day | Do this | Done when |
|---|---|---|
| 1 | Parts 1 and 2: open the terminal, install Claude Code, log in | claude --version shows a number |
| 2 | Part 3: practice folder, plan mode, /init, the starter CLAUDE.md, git |
You've approved your first plan |
| 3 | Part 4: the setup message | Every row in the final table has a tick |
| 4 | Part 5: make a .env, get one key, generate your first image or OpenRouter answer |
first-image.png exists |
| 5 | Your role chapter: do Project 1 on real work | It saved you real time |
| 6 | Save Project 1 as a skill | /your-skill works |
| 7 | Pick the job you hate most this week. Hand it over, in plan mode | You never do it by hand again |
How it compares
| Claude Code | Claude (Cowork) | Hermes | OpenClaw | |
|---|---|---|---|---|
| Best at | building, files, running programs | documents, decks, chat | scheduled always-on jobs | chat-app assistant |
| Works in a folder | ✅ | ✅ | ✅ | ✅ |
| Terminal needed | optional, desktop app exists | no | yes | yes |
| Runs on a schedule | ✅ | ✅ | ✅ | ✅ |
| Model choice | Claude, or others via API | Claude | any | any |
| Ecosystem size | largest | shared skills | large | large |
Not sure which agent you need? Start with How to Choose an AI Agent.
Verdict
🟢 Run it
We use Claude Code every day at Massive Impact. That's why this guide went looking hardest for the problems, and why they're quoted in full.
It's the most capable general-purpose agent we've tested, with the largest ecosystem around it, and it isn't only for developers. If your work lives in files, it's for you.
The real caveats are the usage limits (contested, and sensitive to how you use it) and the discipline it needs: plan first, check the result, keep keys safe, keep humans signing off.
This week: do Parts 1 to 5, then Project 1 from your role chapter, on real work.
Sources
Official, checked 1 October 2026
- Claude Code overview, setup, commands, permission modes, settings, permissions, model configuration
- Memory and CLAUDE.md, skills, subagents, hooks, hooks guide, MCP, plugins
- Checkpointing, CLI reference, headless, GitHub Actions, desktop, remote control, scheduled tasks, environment variables
- Agent SDK overview and quickstart; Managed Agents overview
- claude.com/pricing and What is the Max plan
- OpenRouter quickstart, authentication, limits, FAQ, image generation
- ImageRouter, ImageRouter docs, pricing
- python.org downloads, Python on Windows, Python on macOS
- Node.js downloads, Node.js releases
- Homebrew, WinGet (Microsoft Learn), Git for Windows, Git for Mac, FFmpeg downloads, uv installation
- python-dotenv, dotenv, GitHub: ignoring files, GitHub: secret scanning
- Google Ads: responsive search ads, Google Ads MCP server, Meta ads MCP server
- Figma MCP server installation, Canva AI Connector
- OpenAI Whisper, rembg, Remotion, anthropics/skills
- Star counts: GitHub REST API, 1 October 2026
Tested by us on 1 October 2026 (macOS, Claude Code 2.1.286): the Python toolbox in Part 4 (every library installed and imported), Whisper transcription to a subtitle file, and rembg background removal. Every terminal screenshot in this guide is a real capture.
Community reports, quoted with upvotes. Anecdotes, not measurements.
- Today I lost any shred of self respect I had left as a software engineer (1,915 votes)
- The single best thing I've put in CLAUDE.md (221 votes)
- The new usage limits make subscription and team plans useless for real work (585 votes)
- Something is wrong with usage this week (483 votes)
- Man, what are these limits (38 votes)
Part of The Agent Guides by Massive Impact. Illustrations generated in-house. Terminal screenshots are real captures; Windows screens are labelled recreations.
The rest of the guide is yours, free.
Enter your email to keep reading and get the PDF to keep.
No spam. One email unlocks every Massive Impact resource.
“SEO and search optimization always goes above and beyond my head. Marketing? I'm in the best of hands right now.”
The service behind this
More from the library
